Wednesday, November 30, 2011

New Guest Blog Section 2012

Are you interested in sharing your DIY crafts and recipe ideas?

After two years of blogging and now Etsying, Tweeting, Facebooking, and Pinning, I’ve come to the conclusion that there are not only a lot of wonderful Mommy and Daddies-sites on the web, there are also many creative people out there who also make crafts, clothes, and food items for their family and friends.

I've decided to start sharing some of the best ideas that I’ve found on the web and allow you to also send in your DIY ideas for possible submission. If you are interested in guest blogging with A Little Donnerwetter, click on the link to the right titled “Submission” for more detailed information on how to apply.

If your submission is accepted, I will either post your entire tutorial on my blog or give a short abstract including pictures explaining your idea with a link to your blog or webpage with more info. Your site will also be added to My Blog and Link List directly on my page. If you are just beginning to get out into the web, this is a great way to get more people to come to your site.

My first guest blog will appear in January of 2012 and if successful, will become a monthly addition to A Little Donnerwetter. I'm looking forward to receiving many creative submissions and finding a lot of creative people on the web, so get sewing, crafting, or cooking!

Kelley

Monday, November 28, 2011

Baby Winter Sleepsack

Brrr. Winter is on its way.

Lukas's sleepsack, one that I had made for Jonas in the summer, was just not warm enough. As it is with my boys, the store bought sleepsacks were all too short, and I hate putting my kids in 100% polyester sleepers since they have such sensitive skin and get heat rash easy. Nevertheless, because my little Lukas is such a snuggler, I still wanted to make this sleepsack nice and soft and cuddly warm.

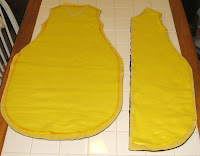
This is the third sleepsack that I have made so I made sure to make it big enough for him to grow into a little. I decided on two layers of soft 100% organic cotton flannel with a layer of fleece in between. The first night I put Lukas in his sleepsack, he slept straight through the night until 5:30 in the morning. Therefore, it was definitely worth the time I invested into making it.

A sleepsack is not the easiest thing to sew, especially if you are not familiar with zippers. Although it is possible to make them with ties or snaps, I prefer the ease of being able to zip the sleeper quickly up or down in case of a late night diaper change. I also like adding some sort of embellishment. We had just been to an airshow, so I put an airplane on this one. I like the contrast of yellow to blue and the airplane for this color scheme worked well.

If you want more info on sleepsacks, take a look at my earlier post from July 17, 2010 - http://kelley-donner.blogspot.com/2010/07/baby-sleep-sack.html.

Here is the How to:

1. Since I already have a pattern for a sleepsack, it was easy for me to just trace around one of my old sleepsacks and add a bit more material for growth. If you don’t have a pattern, lay down a onesie or a shirt on a piece of newspaper and draw around the top to make a vest pattern. Then draw the sides down around like a pear making sure that you have at least 6-12 inches more length than your child is long. I used an orange Crayola washable marker to do this (They really do wash out wonderfully, even on the couch). This will be the back of your sleep sack. For the front, take the same pattern and fold it in half. Then cut out the neck like a v. You will need a left and right side.

2. Cut the flannel out according to your new pattern. I cut out blue for the outside and yellow for the inside. Then I cut a half an inch off of the pattern that I had so that you have a slightly smaller version and used it for my fleece material. If you want to put an embellishment on your sleepsack, here the airplane, you will need to do it now before you sew everything together.

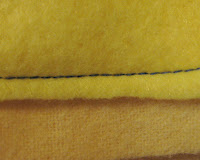
3. Sew the fleece material onto the material that you will be using for the inside, in this case the yellow flannel (see pictures). If the fleece were the same size as the rest of the material, your seams would end up being really really thick. In order to avoid this, we have just sewn the fleece in a half inch so that later you will only be sewing the flannel pieces together.

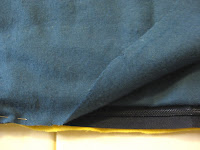
4. Now take your left side pieces and lay them together with the best sides touching each other. Your fleece piece will be facing out. Take your zipper and put it in between your two pieces so that the material completely covers it. Use stick pins to pin the zipper to the material. Now sew the zipper in place by making a seam at the edge of your material with only about a 1.5 to 2 mm edge and sew just until the end of the zipper material. If you sew too close to the inside of the zipper, your material will always catch on it when you zip the sleepsack up or down. Do the same on the other side. Fold the pieces back out to make sure that your sleepsack zips correctly, then fold back.

5. Now you will need to sew a horizontal line at the end of the zipper to sew the ends shut. Then take the two pieces and sew from the inside of the horizontal line down to the end of the material. I hope I have explained this well enough, but in the end when you open up the two pieces, you should now have one piece that fits reasonably well onto the other piece that you cut out. If it is a little two big at the bottom, you can make pleats like I did and if the zipper looks silly at the bottom you can always add a little triangle piece of material over it. I usually do this anyways, because I like the look of it.

6. If you want a seamless sleepsack, you will now need to take your back piece of flannel and lay it down, here my blue piece. Then I lay my new front piece with the zipper with the good side down toward the blue piece. Finally, I lay the yellow piece of flannel on the top. Use stick pins to pin the pieces together from under the arm all the way around to the other armpit. Then sew the pieces together with about a quarter inch of material around the edge. Remember, you should only be sewing together four pieces of flannel and not the fleece.

7. Then pin the top of the arms and sew them together leaving not only a quarter inch of material at the top, but also a half inch on each side. Now fold your sleepsack back right-side-in so that the pieces are all where they should be.

8. Now fold the material in about a quarter of an inch around the neck and arms and iron flat. Then sew these seams using matching thread on the outside. Your sleepsack is now finished. Way to go!!!

Thursday, November 17, 2011

Christmas Teething Bandanas

Lukas just got his second tooth and the drool is still coming. I'm glad that I have plenty of teething scarves on hand, because he goes through about one an hour right now. He also loves his teething ring and can now pick it up himself and put it in his mouth. It's amazing just how fast babies grow. Soon he'll be crawling! Remember, if you would like to know how to make these scarves, teething rings, or other items on this blog, just scroll down the posts or use the search engine on right.

Here are some of the latest teething scarves that I've made. I made a bunch of these scarves for a local church bazaar and still have a few left. You can purchase them on Etsy.com if you're interested in some baby Christmas gifts or are going to some baby showers soon. I will also be selling them under the name Teething Bandanas, as more people search for bandanas for babies than scarves. http://www.etsy.com/shop/aLittleDonnerwetter

The time before Christmas is always really busy, getting Christmas gifts together and visiting family. I have so many projects on hold right now that I hope I don't forget them all. Since my apartment is so small, my sewing machine is by the kitchen table tempting me constantly. I have a lot of other ideas for paintings and things, but I made a vow when I got kids to only start as many projects as I can actually finish. So far it has worked pretty well and I've gotten a lot more done than I would have otherwise. My painting will have to wait, because I still have a few more projects on the sewing machine on my list. Maybe I better write them down, so I don't forget.

Wednesday, November 9, 2011

John Deere Winter Scarf

All of the sudden it got cold here in California. At least in comparison to the 80 degrees that we were used to for so long. I realized that my son didn’t have many warm clothes and his desire to play outside didn’t change in spite of the falling temperatures.

I found some John Deere Christmas fabric from last year and thought it might make a cute winter scarf. Since Jonas is now two and doesn’t like wearing anything constricting, a normal scarf wouldn’t do. He would just yank at it until he either started choking or pulled it off.

Therefore, I decided to use a similar technique to my European scarf and make a winter scarf that looked like it wrapped around the head, but really snapped in the back. This scarf has a double layer of cotton and fleece and when rolled over adds quite a bit of warmth. The tractors on it also help, since Jonas loves tractors and will always wear something with a tractor on it over anything else.

By the way, I know my son needs a haircut in this picture, but cutting a two-year-old's hair is really a challenge for another day.

Here’s the how to:

1. First cut a strip of cotton 46 x 6 inches and fleece 40 x 6 inches and lay them over each other so that the fleece and cotton meet on one side. Now sew the end of the strip closed with the good sides facing each other leaving about a fourth of an inch of rest material. Sew the other side closed the same way (since the cotton strip is longer, you will have to fold it over a little in the middle so that the fleece and cotton meet).

2. Now fold the strip in half so that the fleece/cotton piece is exactly over the other and the extra cotton strip hangs out to the side. Fold the material over itself one more time now lining up with the cotton strip. Cut a rounded off triangle off each side of the folded strip. It may help to look at the picture for this one. Where the material gets smaller is where later the snap will go. This part will go behind the neck.

3. Sew all the way around your strip of material leaving just enough of a gap that you can turn the material back right-side-in.

4. Once your material is back right side in, fold the pieces once again over each other like you had them to cut the triangles. Iron flat and then sew around the entire piece again making sure to fold in the area where you had turned the material inside-out. I used the zig-zag stitch because I like the look of it and it makes a strong seam.

5. Now sew a line down the side where the fleece and cotton meet about a quarterof an inch in. Then sew a line down the other side also where the fleece and cotton meet about a quarter inch in (see picture).

6. Add your snaps, one to the cotton strip (this piece folds over the outside of the other strip so that it’s not to bulky) and one on the inside strip of cotton/fleece on the other side and you’re finished. I use the snaps that you put in place and hammer in. They are a lot faster and don’t come off as easy as the sew on types.

This scarf may have sounded a bit more complicated than the others, but as you see in the pictures, once you get the hang of it, it also goes super fast on the machine. I made this one one morning in between feeding and playing with my kids. It’s also super cute and warm! I cut enough material to make another one for Lukas as soon as I get time.