
 A Linocut and watercolor illustration
From inspiration
to cover design
This morning at the World Book Day event in my child's school, I was lucky enough to be able to help out with some creative writing workshops led by Debbie Edwards, a local author. Superhero stories were definitely something the children could relate to and I really enjoyed watching them enthusiastically being a part of the creative process and seeing how a story is made from start to finish.

As my children were also at the school and told some of their peers that their mother is an author/illustrator, at the end of the session one of the pupils asked how I did my pictures. When I look at children's books I often ask the same question and I wished I could have given my own workshop today on the subject (maybe next year). I also find it fascinating to see how other artists do their work and how they get from start to the finished product.
Therefore, I would like to show the creative process that was used for the cover of my latest book Little Jack Thomson and his Magnificent Brain (For more info on Jack's story, please see my website kelleydonner.com).
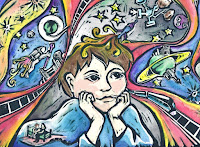
Jack, the main character, has changed a lot since I invented him. Originally, when I made the initial cover, he was daydreaming and lost in thought about his intergalactic space train and his dreams of mining rocks on Neptune. However, after awhile I realized that the cover made him look too melancholy and almost sad. He also looked too old for the children that I was trying to reach.
Since the book is uplifting, I did not want the cover to be anything less. Therefore, I went back to the drawing board and invented Jack again. This time I made him look enthusiastic and tried to convey a sense of pride. Although I think both the original and the final cover pictures are nice, the latter definitely gives the reader more of an immediate feel-good emotion. Books are often bought by the look of their cover, so I knew it was imperative that it grabbed attention and I think this Jack pulled the reader into his world in an uplifting positive way. Nevertheless, it was a long process to get there.
Here is my creative process for making a linocut/watercolor illustration:
 1. When I have an idea for a character I first begin by looking at stock photos online. For example, if the child should be withdrawn, then I would type in "withdrawn child" and see what images come up. If he should be proud, then I would look up words like proud, ambitious, determined, etc.. This helps to give me the general feeling I would like to evoke. Then I take the photos that I like best and incorporate them in my head with my own ideas and start drawing some sketches.
2. Once I have the sketch that I would like to use, I transfer the drawing to a piece of linoleum or easy-cut lino. Then I begin the part of the process that I enjoy the most, cutting the lino. I find this to be very meditative and I love how the drawing takes on a new personality when cut out completely.

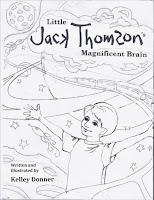
 3. Once the lino is finished, I make a print. Then after the print has dried, I scan it into the computer. I use various photo programs, but mainly Photoshop to improve on the print. I whiten the background and take out any unnecessary lines. Then I print this onto watercolor paper using my normal printer and the flatter back side of the paper. I am delighted to say that this works very well and most printer ink is permanent and does not run later during the painting process.
4. At this point, I begin painting using watercolors. If I am unhappy with the result, I just use another printout and begin again. Sometimes, I will go over some of the lines again with a sharpie or black magic marker if the paint has washed over the lines and left the black too dull. This can also be done in Photoshop, but I often prefer the traditional method.
5. Although watercolors do make beautiful colors, they are often not brilliant enough. This is why I usually scan the finished watercolor back into Photoshop and rework the picture a final time. As you can see here, I decided that the background was way too busy. The viewer has too many things to look at and Jack is lost a bit in this sea of colors. Therefore, part of the process of coming up with a final print is knowing what to cut out. I also cut out the planet at the bottom and one rocket.
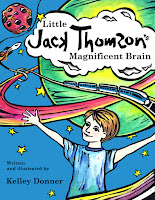 6. Now that my picture is finished, I can add it to a text program and begin making the final page. Here is the current draft cover for Little Jack Thomson's Magnificent Brain.
Unfortunately, when making a book, this is only the beginning. I have decided to try to do the entire creative process for Little Jack Thomson's Magnificent Brain from the text to illustrations to layout. I have already finished about half of the illustrations and I am currently playing around with some layout programs to see how I like the design. Even if I decide at the end, to send this book off to a publisher, I will feel better knowing that I know the process from start to finish. I am really enjoying making this book and I can't wait until it is finished and in stores near you.
To be continued...
 |
| First edition Jack |

Jack, the main character, has changed a lot since I invented him. Originally, when I made the initial cover, he was daydreaming and lost in thought about his intergalactic space train and his dreams of mining rocks on Neptune. However, after awhile I realized that the cover made him look too melancholy and almost sad. He also looked too old for the children that I was trying to reach.
Since the book is uplifting, I did not want the cover to be anything less. Therefore, I went back to the drawing board and invented Jack again. This time I made him look enthusiastic and tried to convey a sense of pride. Although I think both the original and the final cover pictures are nice, the latter definitely gives the reader more of an immediate feel-good emotion. Books are often bought by the look of their cover, so I knew it was imperative that it grabbed attention and I think this Jack pulled the reader into his world in an uplifting positive way. Nevertheless, it was a long process to get there.
Here is my creative process for making a linocut/watercolor illustration:
 1. When I have an idea for a character I first begin by looking at stock photos online. For example, if the child should be withdrawn, then I would type in "withdrawn child" and see what images come up. If he should be proud, then I would look up words like proud, ambitious, determined, etc.. This helps to give me the general feeling I would like to evoke. Then I take the photos that I like best and incorporate them in my head with my own ideas and start drawing some sketches.
2. Once I have the sketch that I would like to use, I transfer the drawing to a piece of linoleum or easy-cut lino. Then I begin the part of the process that I enjoy the most, cutting the lino. I find this to be very meditative and I love how the drawing takes on a new personality when cut out completely.

 3. Once the lino is finished, I make a print. Then after the print has dried, I scan it into the computer. I use various photo programs, but mainly Photoshop to improve on the print. I whiten the background and take out any unnecessary lines. Then I print this onto watercolor paper using my normal printer and the flatter back side of the paper. I am delighted to say that this works very well and most printer ink is permanent and does not run later during the painting process.
4. At this point, I begin painting using watercolors. If I am unhappy with the result, I just use another printout and begin again. Sometimes, I will go over some of the lines again with a sharpie or black magic marker if the paint has washed over the lines and left the black too dull. This can also be done in Photoshop, but I often prefer the traditional method.
5. Although watercolors do make beautiful colors, they are often not brilliant enough. This is why I usually scan the finished watercolor back into Photoshop and rework the picture a final time. As you can see here, I decided that the background was way too busy. The viewer has too many things to look at and Jack is lost a bit in this sea of colors. Therefore, part of the process of coming up with a final print is knowing what to cut out. I also cut out the planet at the bottom and one rocket.
 6. Now that my picture is finished, I can add it to a text program and begin making the final page. Here is the current draft cover for Little Jack Thomson's Magnificent Brain.
Unfortunately, when making a book, this is only the beginning. I have decided to try to do the entire creative process for Little Jack Thomson's Magnificent Brain from the text to illustrations to layout. I have already finished about half of the illustrations and I am currently playing around with some layout programs to see how I like the design. Even if I decide at the end, to send this book off to a publisher, I will feel better knowing that I know the process from start to finish. I am really enjoying making this book and I can't wait until it is finished and in stores near you.
To be continued...