

 It’s hot outside, at least 100 degrees.
 I really feel sorry for those babies out there who are being nursed under heavy wool blankets. That’s gotta be hot and uncomfortable. Nevertheless, nursing out in the open just doesn’t seem appropriate in small town USA.
I have seen different kinds of nursing cover-ups, some more practical than others. I decided to make my own with what I find nice – comfort for baby, light and airy for both of us, and, if possible, a little bit stylish.
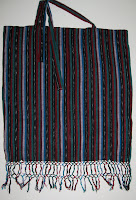
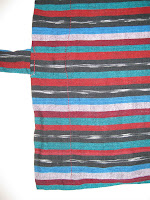
 Then, one evening it dawned on me. I have a zillion unused summer scarves from Germany that I once wore a lot, but now are just sitting up on a shelf. If I cut these scarves in half, I could use the one half as a cover up for the baby, and make ties out of the other half to go around my neck. Here is the first nursing scarf that I came up with. I love this scarf, because of the tassels and am happy that it now has a new use. In the picture, you can see me using this new scarf at the zoo. It worked great!
Here’s the how to:
 1. I put the scarf over my shoulder and made sure that I had enough length to cover a nursing baby and marked this spot. I then cut the scarf horizontally at this point.
2. With the remaining material, I cut out two long strips of fabric about 2 inches wide. Then, I folded each strip on the reverse side and sewed along the edge, leaving about a quarter of an inch. I turned each strip back ride side front and ironed them flat. Now, I had the ties for my neck.
 3. Now, take the ties and lay them lengthwise on the fabric, so that the open end is even with the rough end of the scarf that was cut and pin in place. Make sure the ties are at least a foot apart, so that you can look between them later to see your baby. My scarf was pretty wide, so I also had at least 6 inches left between the tie and the sides of the scarf. Now, sew the entire top of the scarf including the ties down about a quarter of an inch.
4. Take the end where you just sewed and fold it down again about an inch to an inch and a half and sew once along the bottom of the fold and once on the top. If you want to cinch your scarf later, or add some wire to make it more stable (you can by special wire in fabric for this at a fabric store), you have a place to do so.
5. Finally, Put the ties around your neck and tie them in a knot. Now flip the scarf over one shoulder and you are ready to nurse in style.
I have seen different kinds of nursing cover-ups, some more practical than others. I decided to make my own with what I find nice – comfort for baby, light and airy for both of us, and, if possible, a little bit stylish.
Hmmm…
 Then, one evening it dawned on me. I have a zillion unused summer scarves from Germany that I once wore a lot, but now are just sitting up on a shelf. If I cut these scarves in half, I could use the one half as a cover up for the baby, and make ties out of the other half to go around my neck. Here is the first nursing scarf that I came up with. I love this scarf, because of the tassels and am happy that it now has a new use. In the picture, you can see me using this new scarf at the zoo. It worked great!
Here’s the how to:
 1. I put the scarf over my shoulder and made sure that I had enough length to cover a nursing baby and marked this spot. I then cut the scarf horizontally at this point.
2. With the remaining material, I cut out two long strips of fabric about 2 inches wide. Then, I folded each strip on the reverse side and sewed along the edge, leaving about a quarter of an inch. I turned each strip back ride side front and ironed them flat. Now, I had the ties for my neck.
 3. Now, take the ties and lay them lengthwise on the fabric, so that the open end is even with the rough end of the scarf that was cut and pin in place. Make sure the ties are at least a foot apart, so that you can look between them later to see your baby. My scarf was pretty wide, so I also had at least 6 inches left between the tie and the sides of the scarf. Now, sew the entire top of the scarf including the ties down about a quarter of an inch.
4. Take the end where you just sewed and fold it down again about an inch to an inch and a half and sew once along the bottom of the fold and once on the top. If you want to cinch your scarf later, or add some wire to make it more stable (you can by special wire in fabric for this at a fabric store), you have a place to do so.
5. Finally, Put the ties around your neck and tie them in a knot. Now flip the scarf over one shoulder and you are ready to nurse in style.


