

Sunday, December 25, 2011
Merry Christmas
Wednesday, November 30, 2011
New Guest Blog Section 2012
 Are you interested in sharing your DIY crafts and recipe ideas?
After two years of blogging and now Etsying, Tweeting, Facebooking, and Pinning, I’ve come to the conclusion that there are not only a lot of wonderful Mommy and Daddies-sites on the web, there are also many creative people out there who also make crafts, clothes, and food items for their family and friends.
I've decided to start sharing some of the best ideas that I’ve found on the web and allow you to also send in your DIY ideas for possible submission. If you are interested in guest blogging with A Little Donnerwetter, click on the link to the right titled “Submission” for more detailed information on how to apply.
If your submission is accepted, I will either post your entire tutorial on my blog or give a short abstract including pictures explaining your idea with a link to your blog or webpage with more info. Your site will also be added to My Blog and Link List directly on my page. If you are just beginning to get out into the web, this is a great way to get more people to come to your site.
My first guest blog will appear in January of 2012 and if successful, will become a monthly addition to A Little Donnerwetter. I'm looking forward to receiving many creative submissions and finding a lot of creative people on the web, so get sewing, crafting, or cooking!
Kelley
Monday, November 28, 2011
Baby Winter Sleepsack
 Brrr. Winter is on its way.
 Lukas's sleepsack, one that I had made for Jonas in the summer, was just not warm enough. As it is with my boys, the store bought sleepsacks were all too short, and I hate putting my kids in 100% polyester sleepers since they have such sensitive skin and get heat rash easy. Nevertheless, because my little Lukas is such a snuggler, I still wanted to make this sleepsack nice and soft and cuddly warm.
This is the third sleepsack that I have made so I made sure to make it big enough for him to grow into a little. I decided on two layers of soft 100% organic cotton flannel with a layer of fleece in between. The first night I put Lukas in his sleepsack, he slept straight through the night until 5:30 in the morning. Therefore, it was definitely worth the time I invested into making it.
A sleepsack is not the easiest thing to sew, especially if you are not familiar with zippers. Although it is possible to make them with ties or snaps, I prefer the ease of being able to zip the sleeper quickly up or down in case of a late night diaper change. I also like adding some sort of embellishment. We had just been to an airshow, so I put an airplane on this one. I like the contrast of yellow to blue and the airplane for this color scheme worked well.
If you want more info on sleepsacks, take a look at my earlier post from July 17, 2010 - http://kelley-donner.blogspot.com/2010/07/baby-sleep-sack.html.
Here is the How to:
 1. Since I already have a pattern for a sleepsack, it was easy for me to just trace around one of my old sleepsacks and add a bit more material for growth. If you don’t have a pattern, lay down a onesie or a shirt on a piece of newspaper and draw around the top to make a vest pattern. Then draw the sides down around like a pear making sure that you have at least 6-12 inches more length than your child is long. I used an orange Crayola washable marker to do this (They really do wash out wonderfully, even on the couch). This will be the back of your sleep sack. For the front, take the same pattern and fold it in half. Then cut out the neck like a v. You will need a left and right side.
2. Cut the flannel out according to your new pattern. I cut out blue for the outside and yellow for the inside. Then I cut a half an inch off of the pattern that I had so that you have a slightly smaller version and used it for my fleece material. If you want to put an embellishment on your sleepsack, here the airplane, you will need to do it now before you sew everything together.
 3. Sew the fleece material onto the material that you will be using for the inside, in this case the yellow flannel (see pictures). If the fleece were the same size as the rest of the material, your seams would end up being really really thick. In order to avoid this, we have just sewn the fleece in a half inch so that later you will only be sewing the flannel pieces together.
 4. Now take your left side pieces and lay them together with the best sides touching each other. Your fleece piece will be facing out. Take your zipper and put it in between your two pieces so that the material completely covers it. Use stick pins to pin the zipper to the material. Now sew the zipper in place by making a seam at the edge of your material with only about a 1.5 to 2 mm edge and sew just until the end of the zipper material. If you sew too close to the inside of the zipper, your material will always catch on it when you zip the sleepsack up or down. Do the same on the other side. Fold the pieces back out to make sure that your sleepsack zips correctly, then fold back.
 5. Now you will need to sew a horizontal line at the end of the zipper to sew the ends shut. Then take the two pieces and sew from the inside of the horizontal line down to the end of the material. I hope I have explained this well enough, but in the end when you open up the two pieces, you should now have one piece that fits reasonably well onto the other piece that you cut out. If it is a little two big at the bottom, you can make pleats like I did and if the zipper looks silly at the bottom you can always add a little triangle piece of material over it. I usually do this anyways, because I like the look of it.
6. If you want a seamless sleepsack, you will now need to take your back piece of flannel and lay it down, here my blue piece. Then I lay my new front piece with the zipper with the good side down toward the blue piece. Finally, I lay the yellow piece of flannel on the top. Use stick pins to pin the pieces together from under the arm all the way around to the other armpit.
 Then sew the pieces together with about a quarter inch of material around the edge. Remember, you should only be sewing together four pieces of flannel and not the fleece.
 7. Then pin the top of the arms and sew them together leaving not only a quarter inch of material at the top, but also a half inch on each side. Now fold your sleepsack back right-side-in so that the pieces are all where they should be.
8. Now fold the material in about a quarter of an inch around the neck and arms and iron flat. Then sew these seams using matching thread on the outside. Your sleepsack is now finished. Way to go!!!
Thursday, November 17, 2011
Christmas Teething Bandanas
 Lukas just got his second tooth and the drool is still coming. I'm glad that I have plenty of teething scarves on hand, because he goes through about one an hour right now. He also loves his teething ring and can now pick it up himself and put it in his mouth. It's amazing just how fast babies grow. Soon he'll be crawling! Remember, if you would like to know how to make these scarves, teething rings, or other items on this blog, just scroll down the posts or use the search engine on right.
Here are some of the latest teething scarves that I've made. I made a bunch of these scarves for a local church bazaar and still have a few left. You can purchase them on Etsy.com if you're interested in some baby Christmas gifts or are going to some baby showers soon. I will also be selling them under the name Teething Bandanas, as more people search for bandanas for babies than scarves. http://www.etsy.com/shop/aLittleDonnerwetter
 The time before Christmas is always really busy, getting Christmas gifts together and visiting family. I have so many projects on hold right now that I hope I don't forget them all. Since my apartment is so small, my sewing machine is by the kitchen table tempting me constantly. I have a lot of other ideas for paintings and things, but I made a vow when I got kids to only start as many projects as I can actually finish. So far it has worked pretty well and I've gotten a lot more done than I would have otherwise. My painting will have to wait, because I still have a few more projects on the sewing machine on my list. Maybe I better write them down, so I don't forget.
Wednesday, November 9, 2011
John Deere Winter Scarf
 All of the sudden it got cold here in California. At least in comparison to the 80 degrees that we were used to for so long. I realized that my son didn’t have many warm clothes and his desire to play outside didn’t change in spite of the falling temperatures.
 I found some John Deere Christmas fabric from last year and thought it might make a cute winter scarf. Since Jonas is now two and doesn’t like wearing anything constricting, a normal scarf wouldn’t do. He would just yank at it until he either started choking or pulled it off.
Therefore, I decided to use a similar technique to my European scarf and make a winter scarf that looked like it wrapped around the head, but really snapped in the back. This scarf has a double layer of cotton and fleece and when rolled over adds quite a bit of warmth. The tractors on it also help, since Jonas loves tractors and will always wear something with a tractor on it over anything else.
By the way, I know my son needs a haircut in this picture, but cutting a two-year-old's hair is really a challenge for another day.
 Here’s the how to:
1. First cut a strip of cotton 46 x 6 inches and fleece 40 x 6 inches and lay them over each other so that the fleece and cotton meet on one side. Now sew the end of the strip closed with the good sides facing each other leaving about a fourth of an inch of rest material. Sew the other side closed the same way (since the cotton strip is longer, you will have to fold it over a little in the middle so that the fleece and cotton meet).
 2. Now fold the strip in half so that the fleece/cotton piece is exactly over the other and the extra cotton strip hangs out to the side. Fold the material over itself one more time now lining up with the cotton strip. Cut a rounded off triangle off each side of the folded strip. It may help to look at the picture for this one. Where the material gets smaller is where later the snap will go. This part will go behind the neck.
 3. Sew all the way around your strip of material leaving just enough of a gap that you can turn the material back right-side-in.
 4. Once your material is back right side in, fold the pieces once again over each other like you had them to cut the triangles. Iron flat and then sew around the entire piece again making sure to fold in the area where you had turned the material inside-out. I used the zig-zag stitch because I like the look of it and it makes a strong seam.
 5. Now sew a line down the side where the fleece and cotton meet about a quarterof an inch in. Then sew a line down the other side also where the fleece and cotton meet about a quarter inch in (see picture).
 6. Add your snaps, one to the cotton strip (this piece folds over the outside of the other strip so that it’s not to bulky) and one on the inside strip of cotton/fleece on the other side and you’re finished. I use the snaps that you put in place and hammer in. They are a lot faster and don’t come off as easy as the sew on types.
 This scarf may have sounded a bit more complicated than the others, but as you see in the pictures, once you get the hang of it, it also goes super fast on the machine. I made this one one morning in between feeding and playing with my kids. It’s also super cute and warm! I cut enough material to make another one for Lukas as soon as I get time.
Saturday, October 29, 2011
New - Items for Sale!!!
 Man, I love my new sewing machine! I already have over 25 teething scarves and 10 teething rings ready to go for my Mom's group church bazarre and I still have a bunch of material cut and ready to be sewn. I've been having so much fun getting everything together. This last week, I decided it might be great to sell a few items on Etsy.
 I now have a shop set up with Christmas gift sets as well as organic cotton teething scarves and teething rings. http://www.etsy.com/shop/aLittleDonnerwetter?ref=seller_info

Remember, babies get 20 new teeth and go through a lot of drool. Lukas just got his first tooth today at 5 1/2 months. I put him in a teething scarf every morning and change it whenever it's wet. I often get comments about how cute he looks in his little bandana, and normally bibs just don't look very stylish.
I also feel a lot better about him chewing on his little organic teething ring instead of a BPA plastic one. This tooth came in without any tears. Yeah!
If you need a gift for a baby for Christmas or are going to a baby shower soon, please check out my shop. If you have any questions, please let me know. Thank you for your support!!!
Friday, October 21, 2011
Pumpkin Pie Muffins (Two-year-old Approved!)
 It’s been really tough trying to get my two year old to eat vegetables. These muffins started as an experiment to see if I could get my son to eat pumpkin, since he usually crinkles his face up whenever he has to eat any. He loved these muffins and kept yelling for more. Yippee! Another success story.
These muffins have a whole lot of pumpkin in them and are therefore really moist. They taste a lot like pumpkin pie, hence the name, and are so yummy you could almost eat them for dessert, even though they have little added sugar and a bunch of whole wheat.
Remember, if you are putting nuts in for little kids, you will need to either chop them up really tiny or grind them first.
I’m going to make these again soon. If you make them, too, let me know what you think and tell me if your little one also ate them as well.
Pumpkin Pie Muffins
1 15 oz can Libby Pumpkin
1 C whole wheat flour
1 C white flour
2 eggs
1/3 C oil
1/2 C brown sugar
Pinch salt
1 t Pumpkin pie spice
1 t baking powder
1 t baking soda
3/4 C milk
1 C raisins
2/3 C chopped walnuts
3/4 C milk
1 C raisins
2/3 C chopped walnuts
Topping
1. Mix the can of pumpkin together with the brown sugar. Add the eggs and mix well. For muffins, you really don’t need to get your mixer dirty. A good wooden spoon usually does the trick. When you are adding the eggs, just beat them in the measuring cup first with a fork.
2. Add the oil, milk, and spices and mix together.
3. Mix together dry ingredients and add to wet ones. Mix well with a spoon.
4. Add raisins and walnuts and then spoon into 12 muffin cups. I usually use two spoons for this, but you can also use a ½ cup.
 5. In another bowl, mix together the topping ingredients: ¼ C brown sugar, 1 t cinnamon, and 1/3 cup chopped walnuts. Sprinkle this mixture on top of muffins.
6. Bake at 375 degrees for about 35 minutes. These muffins take a bit longer than most muffins because they are very moist. When a toothpick comes out nice and clean, your muffins are done.
7. Eat warm with butter and maybe a dab of honey. Enjoy!
1/4 C brown sugar
1 t cinnamon
1/3 C chopped walnuts
1. Mix the can of pumpkin together with the brown sugar. Add the eggs and mix well. For muffins, you really don’t need to get your mixer dirty. A good wooden spoon usually does the trick. When you are adding the eggs, just beat them in the measuring cup first with a fork.
2. Add the oil, milk, and spices and mix together.
3. Mix together dry ingredients and add to wet ones. Mix well with a spoon.
4. Add raisins and walnuts and then spoon into 12 muffin cups. I usually use two spoons for this, but you can also use a ½ cup.
 5. In another bowl, mix together the topping ingredients: ¼ C brown sugar, 1 t cinnamon, and 1/3 cup chopped walnuts. Sprinkle this mixture on top of muffins.
6. Bake at 375 degrees for about 35 minutes. These muffins take a bit longer than most muffins because they are very moist. When a toothpick comes out nice and clean, your muffins are done.
7. Eat warm with butter and maybe a dab of honey. Enjoy!
Tuesday, October 11, 2011
Baby Teething Rings
 As you well know, my son Lukas is teething. In addition to teething scarves, my baby also needed something to chew on. So, I decided to use some of the leftover organic cotton material that I had to make some teething rings for Lukas.
These eco-friendly teething rings are made using hemp twine, natural unfinished wooden beads and organic cotton material. I put extra knots and seams in them to make sure that they are safe for a baby. I throw this teething ring in the washer every time I wash, since it is often soaked in drool. It still looks like new.
 My little Lukas loves to chew on his teething ring, especially while he is sitting on my lap. Sometimes, I’ll even wear the ring on my arm, although usually he enjoys holding it.
 If your child is really teething, you may need to make a few, because they can get wet pretty fast. Nevertheless, it’s worth it, because your child will love the combination of soft material and the hard wooden beads to massage their little sore gums.
If you would like to buy a teething ring, you can now get them on Etsy.com under handmade - organic teething ring.
Here’s the how to:
1. Cut a 5” x 40” piece of material. Fold it vertically with the wrong side outside and sew along the edge leaving about a quarter to a half inch of material. For extra strength, you can sew this seam twice.
 >2. Cut a piece of hemp cord that is 2 ½ times longer than the piece of material, i.e. about 100 inches. Fold this cord in half and tie a loop knot in the middle. Sew this knot loosely on one of the open sides of the material at the seam (see picture).
3. Take the other open side of the material and turn the entire tube inside out bringing the right side of the material back on the outside.
4. Now scrunch the material back on the hemp cord as far as you can and make a knot in the cord. Thread a bead on one of the hemp cords and push it down to the knot. Tie a knot as close as you can above the bead using both cords. Now tie a knot in the material above and below the bead. Your knot in the cord will fall somewhere in the material knot.
 5. Continue to add knots and beads using the same method until you are about 6 inches from the end of the material. Make sure you have one final knot in the cord. Cut the cord on both sides. Sew the ends of the material shut and then tie the two ends together as tightly as you can. For added strength, use a needle and thread to reinforce the last knot.
Now you have a happy baby. Finished!
Monday, October 3, 2011
New Teething Scarves
 Now that Lukas has begun teething, it’s time for me to make some more teething scarves. Since he’s only 4 months old, he can’t quite sit up on his own, yet. This makes tying on a scarf a bit difficult. Therefore, these new scarves are all with kid-friendly snaps.
 I’m in the process of making up a bunch of organic cotton teething scarves to sell on Etsy.com along with some other eco-friendly teething toys and stuffed animals. As soon as I have more pictures and items, I’ll post them here first.
If you need any baby gifts for Christmas, I’d be happy to help.
Here are three of my new scarves:
1. Simple – (picture of flower scarf)
Two layers of organic cotton with a snap at the back. Lukas has a few of these, so that when one is wet, I can quick change it with another one.
2. Double - (picture of airplanes in blue)
This scarf has an added triangle on the front for when your child is at the extreme drooling phase of getting teeth. This scarf is also reversible and made of organic cotton with a snap at the back.
3. European – (picture of cars in green)
Although it looks like this scarf ties around the back, it is folded like an accordian with snaps in the back and does not loop around the babies head, making it safer than tie around scarves. It is also tacked on the sides, so that the hanging strips stay in place.
If you would like to make your own teething scarves. Check out the How to under Feburary of 2010 or at http://kelley-donner.blogspot.com/2011/02/teething-scarves.html.

Thursday, September 22, 2011
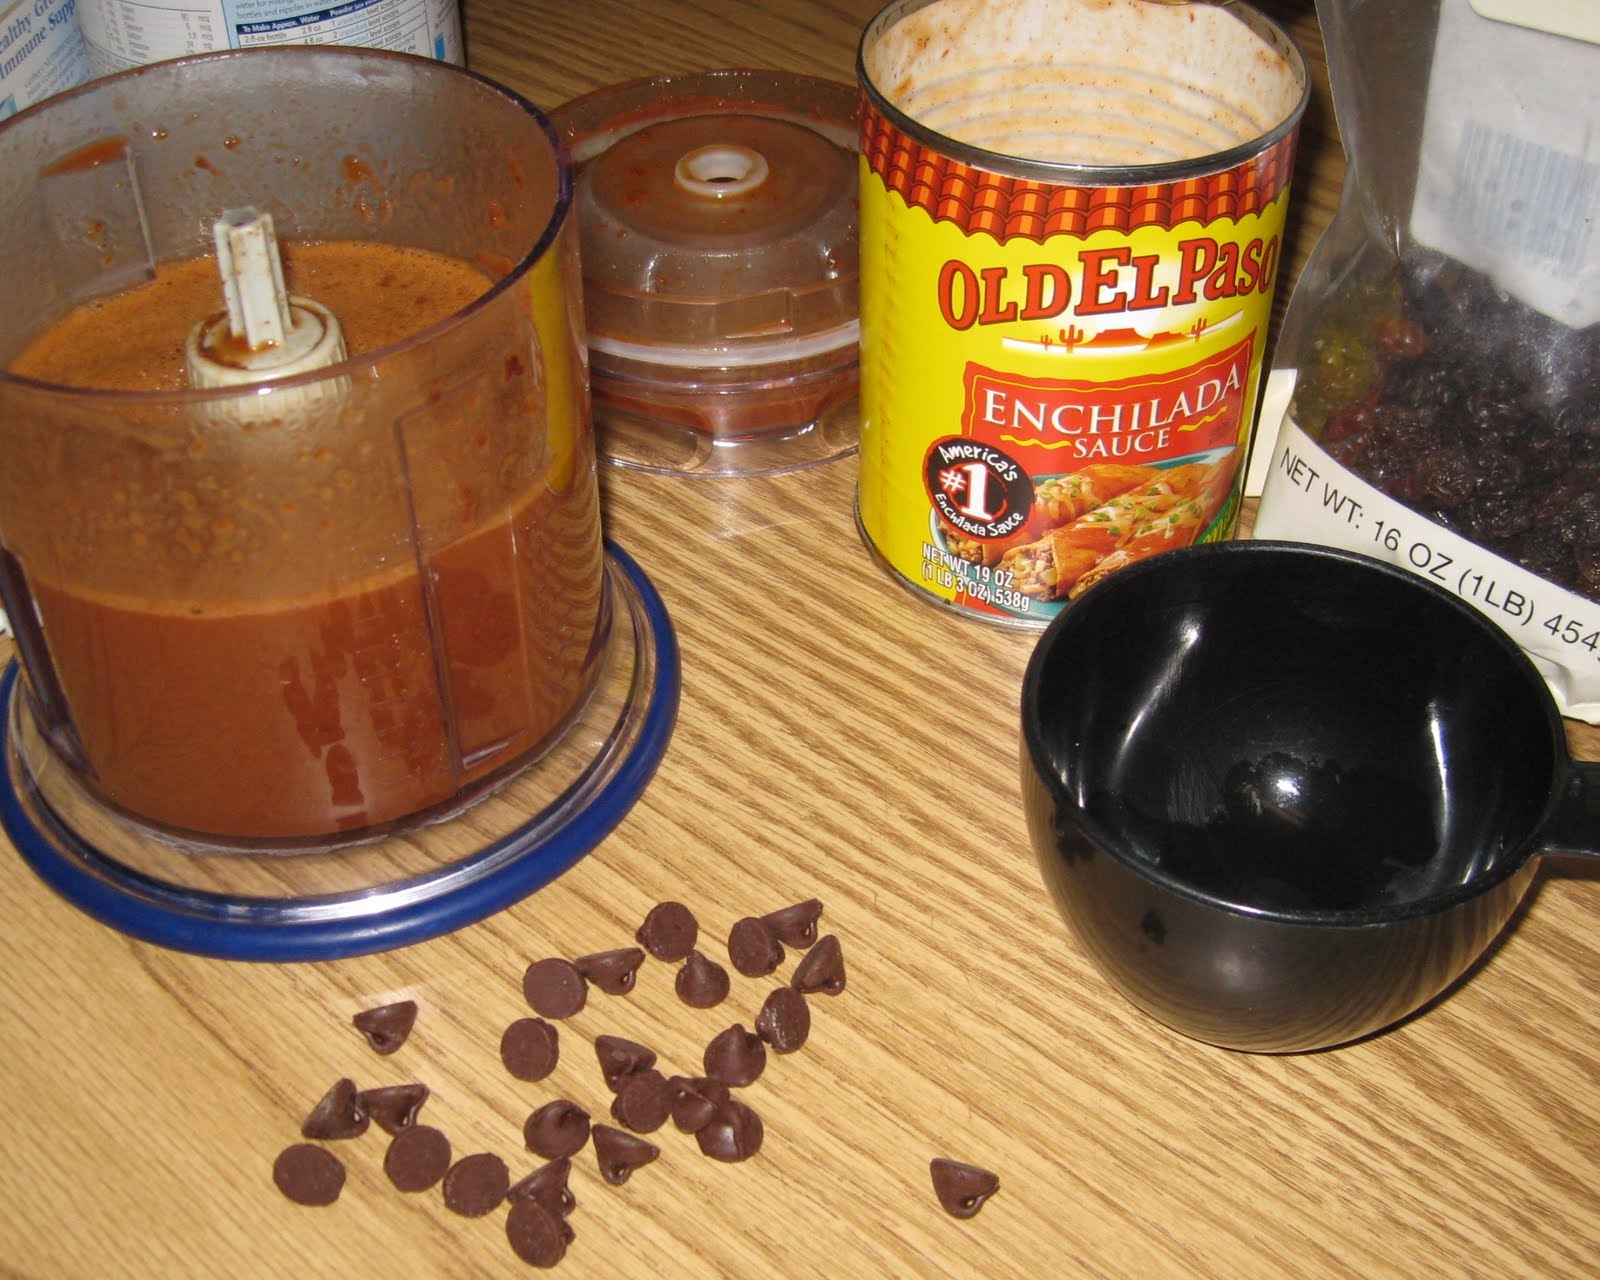
Quick Mole, Butternut, and Black Bean Enchiladas
 If you have never heard of Mole, let me tell you, it’s a wonderful invention. It’s a blend of Mexican spices like chili and chocolate that just melt in your mouth and heat up your palate. If you don’t think that chocolate can be served for dinner, think again.
 Normally, making Mole yourself would take hours. I saw a special on PBS where they made Mole from scratch and it took about 10 hours. I don’t know about you, but I don’t have that kind of time. This recipe is super quick and will give you that same taste with under a half an hour of prep time. The secret is in the sauce. Raisins and semi-sweet chocolate are added to the enchilada sauce to give it Mole flavor without much work.
I make enchiladas at least once a week and experiment constantly with whatever I have in the fridge. These were some of my best enchiladas. Even my picky eater liked it and those of you who have toddlers know that says a lot. I hope you like them, too. Here’s the recipe.
Mole Chicken, Butternut, and Black Bean Enchiladas
½ C raisins, plus a few extra for garnish
1 C water
½ C semi-sweet chocolate chips
1 can enchilada sauce
1 C butternut squash (or other sweet veggie)
12 cherry tomatoes
1 C corn (half a can)
1 can black beans, drained
1 C diced (or pulled) chicken
1 C Cheddar, Monteray Jack, or Mexican cheese plus ½ C for garnish
6 Spoonfuls of sour cream
Cilantro
6-8 Tortillas
Cumin, Paprika, and Chili spices
Optional, extra sour cream and guacamole
 1. Heat the oven to 350 degrees.
2. For the Mole, put water and raisins in a bowl and microwave for about 2-3 minutes. Add chocolate pieces and microwave, if necessary, another 30 seconds. Mix until chocolate melts.
3. Add this mixture to a food processor with the enchilada sauce and puree until smooth. If you don’t have a food processor and have a limited budget, think about the Ninja. I love my Ninja food processor. It’s tiny enough to not take up much space, but is perfect for things like Guacamole or chopping nuts. It has two blades that cut up anything. Also, make sure that you use a good enchilada sauce. Some sauces are too bitter. I like Old El Paso because it is a bit sweeter.
 4. Spray a 9 x 13 pan with oil and then pour in one cup of the Mole sauce. Now it’s time to make the enchiladas.
5. Lay out 6-8 tortillas on your countertop. Take a normal dinner spoon and add a dollop of sour cream to each tortilla. Spread the sour cream around.
6. Distribute the chicken, black beans, butternut, corn, and cheese onto the tortillas in a line down the middle. Sprinkle on some cilantro. Sprinkle cumin, paprika, and chili spice on each tortilla. Now with the toppings in a horizontal line in front of you, fold in the left and right sides a couple of inches, grab the bottom of the tortilla and roll it up folding the top in under the toppings. Lay the enchiladas fold side down in the pan.
 7. Pour the remaining Mole sauce over the enchiladas and use a spoon to make sure that all of the enchiladas are covered with sauce. Add some cheese over the top and sprinkle some raisins down the middle. Bake at 350 degrees for about 25 minutes.
8. Serve with a dollop of sour cream and guacamole. Make sure you also spoon a bit of the Mole sauce over the enchilada on your plate. Enjoy!
Tuesday, July 26, 2011
Banana Brownie Shish Kebabs
 This recipe actually came to me in the middle of the night while I was up nursing my son. It’s good to know that my brain not only comes up with some pretty crazy dreams, but can also process recipes at night.
 I love adding chocolate chips to my banana nut muffins, so the idea of adding bananas to brownies makes perfect sense for my palate.
These brownies are really rich, chocolately, gooey, and full of banana flavor.
Here’s the recipe:
Banana Brownie Shish Kebabs
1 stick butter
½ cup unsweetened cocoa (I’m a big fan of Hershey’s)
¾ cup sugar
2 eggs
¾ cup flour
1 t vanilla
½ cup chopped nuts ( I used walnuts and pecans)
½ cup chocolate chips
2 bananas
For Shish Kebabs:
wooden skewers
whipped cream or Cool Whip
1 banana
 1. Preheat oven to 350 degrees.
 2. Put butter in a bowl and microwave about 45 seconds until just melted. Add cocoa and sugar immediately and beat well.
3. Add vanilla and 2 mashed bananas into chocolate mixture and mix again.
4. Add eggs one at a time and mix after each one. Your batter will have a nice shiny look to it now.
5. Add flour and mix on high one final time until batter is as smooth as batter with bananas will be, i.e. slightly lumpy.
 6. Pour into greased ( I grease with butter) 9 x 9 or 9 x 13 baking dish. I used the larger dish so that I would have a flatter brownie for the kebabs. Bake 30-35 minutes, or until a toothpick comes out clean.
 7. When cool, cut brownies into 1 inch squares. Layer brownies and banana slices onto skewers with whip cream in between each slice. For a party, take a jar and fill it with something heavy, like whole nuts and then put your finished skewers in the jar like pencils. Enjoy!
Friday, July 15, 2011
Colorful Baby Onesie Sew-ons
 I love little baby shirts with pictures of animals and vehicles on them. Many of them that you find in the store even look homemade…
 But, they aren’t. So why not make them myself instead? It really can’t be that difficult to make.
I decided to use Wunderunder fusible web, since I had used a lot of this heat-bonding material in the past and it always worked great. I made some stockings for Christmas and am currently illustrating a children's book using fusible web and various material. I know the pros and cons of such a product. The main advantage is that it is super easy to use, the disadvantage is that it can start to peel after awhile.
 Baby outfits, especially onesies, are washed a lot. I knew that if I used Wunderunder, I would also need to sew around the edges to prevent fraying and peeling over time.
 So, I decided to make some simple patterns which I could sew up quickly. Babies grow really fast, and I figured, that if I didn't get something finished within a couple of weeks, it probably wouldn't fit my baby anymore.
Here are the first two onesies that I made and the How to:
 1. Prewash your onesie and iron it flat.
 2. On a sheet of paper, draw the pattern that you would like to use. Simple items, like cars, animals, and shapes are good to start with. Make sure that your pattern is the right size for your onesie. I decided on a simple dog and a more complicated frog. If you are not good at drawing, find some simple designs in a children’s book.
 3. Take a piece of white paper, lay it over your pattern and trace the large areas that you will need to cut out. Remember, any fine details, you will need to sew on later. Mark an X on each area and cut them all out (The X is so that you remember later which side is up).
4. Cut out squares of your material making sure that you have enough for your pattern. Cut out a piece of Wunderunder the same size and iron it on to the material following the package instructions. Let cool.
 5. Lay the paper cut-outs in reverse on your fabric with the Wunderunder paper side up, trace them, and then cut them out.
6. Peel off Wunderunder paper backing and iron the material pieces onto the onesie.
7. Now, you will need to take a needle and thread and sew around all of the edges of your pattern so that even if it peels later, it will stay put. You can also add little details, like eyes, shadows, and hair if you’d like. I had to add quite a bit of stitching on my frog, but my dog went very quickly. I always double my thread to make the lines darker.
 8. Once your stitching is finished, iron over your pattern one more time. Finished!
Depending on your pattern and the material you use, your onesie may not make it through a thousand poopy washloads. However, if your child grows as fast as mine does, your onesie will probably look great long enough.
Monday, July 11, 2011
Toddler Food Strike Pineapple Tuna Salad
 I love to cook. So, why does my toddler refuse to eat everything, even foods he used to love?
 I guess, that’s normal. At least, that’s what it says online. Although, it sure is frustrating!
After trying to give him more finger foods, which he would promptly hand back to me and say “Mama” (meaning - Mama, you eat it) or throw on the floor, I tried to feed him myself. But, if it wasn’t oatmeal, he would just push my hand away or spit it out. I was flustered.
I never would have thought that tuna salad would do the trick, but he ate it… all of it! I think the key was, it was thick enough that he could spoon it out himself, soft enough, that the texture didn’t bother him, and sweet enough that he liked it. He could also dip crackers in it, which is a plus. Yeah! Finally something worked.
So, now that I know he likes tuna salad, I decided to try to make a version which is a bit healthier and which adds in some fruit. I like the fact that it has less mayonnaise and some healthy yoghurt instead. I’m sure you could also make a chicken salad that is similar, maybe even with some applesauce. I gave him this pineapple tuna salad for lunch today with crackers and he didn’t complain a bit. He actually said, “Yum!”
Pineapple Tuna Salad (4 toddler portions)

1 6 oz can tuna w/water
1 T plain yoghurt
1 T mayonnaise
1 T sweet pickle relish
1 T crushed pineapple
1 Handful cheese fish crackers, or other crackers for dipping.
1. Open tuna and drain water. Add to bowl.
2. Mix in yoghurt, mayonnaise, relish, and pineapple. Mix well.
3. Add 1/3 of tuna salad to a small plastic bowl.
4. Serve with cheese fish crackers.
This recipe couldn’t be easier. Let me know if your toddler eats it or if you have other great dishes that worked during your toddler’s food strike.
Monday, June 27, 2011
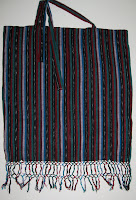
Nursing Scarf

 It’s hot outside, at least 100 degrees.
 I really feel sorry for those babies out there who are being nursed under heavy wool blankets. That’s gotta be hot and uncomfortable. Nevertheless, nursing out in the open just doesn’t seem appropriate in small town USA.
I have seen different kinds of nursing cover-ups, some more practical than others. I decided to make my own with what I find nice – comfort for baby, light and airy for both of us, and, if possible, a little bit stylish.
 Then, one evening it dawned on me. I have a zillion unused summer scarves from Germany that I once wore a lot, but now are just sitting up on a shelf. If I cut these scarves in half, I could use the one half as a cover up for the baby, and make ties out of the other half to go around my neck. Here is the first nursing scarf that I came up with. I love this scarf, because of the tassels and am happy that it now has a new use. In the picture, you can see me using this new scarf at the zoo. It worked great!
Here’s the how to:
 1. I put the scarf over my shoulder and made sure that I had enough length to cover a nursing baby and marked this spot. I then cut the scarf horizontally at this point.
2. With the remaining material, I cut out two long strips of fabric about 2 inches wide. Then, I folded each strip on the reverse side and sewed along the edge, leaving about a quarter of an inch. I turned each strip back ride side front and ironed them flat. Now, I had the ties for my neck.
 3. Now, take the ties and lay them lengthwise on the fabric, so that the open end is even with the rough end of the scarf that was cut and pin in place. Make sure the ties are at least a foot apart, so that you can look between them later to see your baby. My scarf was pretty wide, so I also had at least 6 inches left between the tie and the sides of the scarf. Now, sew the entire top of the scarf including the ties down about a quarter of an inch.
4. Take the end where you just sewed and fold it down again about an inch to an inch and a half and sew once along the bottom of the fold and once on the top. If you want to cinch your scarf later, or add some wire to make it more stable (you can by special wire in fabric for this at a fabric store), you have a place to do so.
5. Finally, Put the ties around your neck and tie them in a knot. Now flip the scarf over one shoulder and you are ready to nurse in style.
I have seen different kinds of nursing cover-ups, some more practical than others. I decided to make my own with what I find nice – comfort for baby, light and airy for both of us, and, if possible, a little bit stylish.
Hmmm…
 Then, one evening it dawned on me. I have a zillion unused summer scarves from Germany that I once wore a lot, but now are just sitting up on a shelf. If I cut these scarves in half, I could use the one half as a cover up for the baby, and make ties out of the other half to go around my neck. Here is the first nursing scarf that I came up with. I love this scarf, because of the tassels and am happy that it now has a new use. In the picture, you can see me using this new scarf at the zoo. It worked great!
Here’s the how to:
 1. I put the scarf over my shoulder and made sure that I had enough length to cover a nursing baby and marked this spot. I then cut the scarf horizontally at this point.
2. With the remaining material, I cut out two long strips of fabric about 2 inches wide. Then, I folded each strip on the reverse side and sewed along the edge, leaving about a quarter of an inch. I turned each strip back ride side front and ironed them flat. Now, I had the ties for my neck.
 3. Now, take the ties and lay them lengthwise on the fabric, so that the open end is even with the rough end of the scarf that was cut and pin in place. Make sure the ties are at least a foot apart, so that you can look between them later to see your baby. My scarf was pretty wide, so I also had at least 6 inches left between the tie and the sides of the scarf. Now, sew the entire top of the scarf including the ties down about a quarter of an inch.
4. Take the end where you just sewed and fold it down again about an inch to an inch and a half and sew once along the bottom of the fold and once on the top. If you want to cinch your scarf later, or add some wire to make it more stable (you can by special wire in fabric for this at a fabric store), you have a place to do so.
5. Finally, Put the ties around your neck and tie them in a knot. Now flip the scarf over one shoulder and you are ready to nurse in style.
Friday, June 10, 2011
Homemade Travel Crib Mattress Pad
 My husband and I decided to get a baby travel crib to use as a baby crib for Lukas’s first few months. Our apartment is not very large, and a travel crib has a lot of advantages: Firstly, it doesn’t take up much space. Secondly, you can push it around from room to room. Thirdly, it is much cheaper than a brand new bassinet/crib. And, finally, it’s high enough that our 19 month old can’t reach well into it. The one disadvantage? The mattress was very hard and sunk in a bit in the middle.
 The solution ended up being a combination of flattening out the bed by adding a piece of cardboard and a blanket under the mattress and adding a mattress cover. The problem was only that they don’t make mattress covers for baby travel cribs. Therefore, I decided to sew one up myself.
I decided to use a similar concept to the baby pillows that I made for Jonas. They have just enough fluff to be comfortable, but are flat enough to be safe. I also added some fold over corners to the cover so that it would stay on the mattress, another safety guard.
I think the resulting cover is so cute, it is really a shame that you have to put a sheet over it. Maybe, when he’s a bit older, I’ll just leave it in the bottom of the playpen.
 Here’s the quick and easy how to:
1. Measure your playpen/travel bed so that you know how big to make your mattress cover. Then cut out 2 pieces of material, plus 2 pieces of thin polyester backing adding a half inch to each side.
2. Now cut out 4 square pieces of material, about 8 x 8 inches. Fold material in half with the nice side on the outside.
3. Lay down the pieces as follows: First one piece of material with the good side facing up. Now add the triangles to each corner, so that the two open ends of the triangle are facing the corner. Then, add your next piece of material with the good side facing down. Finally, lay the polyester backing down on top. If you have difficulties sewing over polyester backing, add a layer of newspaper to this, which you can tear off later. Add stick pins around the entire square to hold.
 4. Leaving about a half inch all the way around, sew around the rectangle until you are about 4-6 inches from where you started. Now turn the entire piece inside out, so that the right side of the material is now on the outside, and the polyester backing on the inside. You will see that the triangles can be folded to either side.
5. Finally, sew up the remaining 4-6 inches by hand and you are finished.
When I added this mattress pad to our crib, my baby finally slept “like a baby.” If you need a temporary crib or travel a lot, consider making your own mattress pad.
Saturday, May 14, 2011
Baby Break
Lukas Jacob is here!
Lukas Jacob Donner was born at 6:06 p.m. on Sunday, May 8, 2011.

Hello everyone,
I just wanted to let all of my readers know, that I will be taking a blog break for the month of May. I gave birth to a beautiful healthy baby boy on Mother's Day and think it's time to take a little break from blogging to just enjoy my little guy. Lukas and I are now home recuperating and just enjoying our time together, now as a family of four.
See you soon!
Kelley
Friday, April 29, 2011
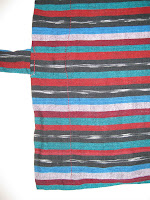
Movable Door Height Marker
 When I was a little girl, the door frame to my bedroom was covered in marks depicting not only my height at various ages, but also the height of my friends and even my stuffed animals. Even after I stopped growing, I loved looking at it and seeing what years I really shot up and who I was friends with at different times. There was so much history on such a short little space.
Now that Jonas is getting older, I wanted to have a place where I could also mark his height. Unfortunately, I've moved so many times in the last few years that I really doubt that it makes sense to use a door frame. So I decided to make a door height marker that I could take with me from one place to the next.
This movable door height marker is made out of material and is a bit different than the one on my bedroom door. I love the visual of seeing how much one grows during each year, because it varies so greatly. Therefore, I decided to cut and sew a piece of material for the first year and then to add pieces of material which extend from this piece for every year after that.
 At the moment, I only have two pieces of material for Jonas, since he is only 18 months old. The first is 21.3 inches long, his birth height, and the second is 9.7 inches, since he was 31 inches at one year (21.3 + 9.7 = 31). On his second birthday, I will add a third piece of material to his marker.
This door height marker can be hung in a door frame, or hung on the wall until the child is a bit older. If you have more than one child, you could hang them next to each other to compare heights. Maybe someday I will sew this one into a quilt and give it to my child when they go off to college, have their own child, etc...
Here is the how to:
1. Cut a piece of material which is four and a half inches wide and so long as your child was at birth plus at least a half an inch. Turn the insides of the material together and sew along the edges with about a quarter inch remaining, leaving the top open. Now turn it back right side in, fold in the top edges a quarter inch and leaving the top open, sew around these edges or iron them down with heat bonding tape. Iron flat.
 2. Iron Wonderunder to a contrasting fabric and then cut out the name of your child and how tall they were at birth. Iron this onto your material. Your first piece is finished!
 3. For every year your child is old, add another piece of contrasting material and the age of the child. Eventually, your door height marker will be very colorful and a great way to remember how small your child once was.
Subscribe to:
Posts (Atom)