Monday, January 23, 2012

Goodbye Palm Trees, Hello Windmills - Donner Family Relocation

Typical Friesen Windmill
We're moving back to Germany!  This time to Friesland, where my husband has taken on a job as a developmental biologist starting the first of March.  

Since we just got the news before Christmas, we have been busy getting packed, selling things we don't need, and trying to find a house -all in one month.  At the same time, my 8 month old baby has gone from crawling to trying to walk and my two year old is gaining his independence.  In other words, I've got my hands full, but I'm excited nonetheless. 

I really love Friesland.  My mother was born in Friesland, Holland, so I grew up listening to my grandmother's stories and hearing her speak Friesen.  I look forward to making lots of bike trips, taking walks with my kids to the local baker, and getting to know my neighbors.  Even though I know I will miss California, especially the sunshine, I'm looking forward to seeing the North Sea and its holiday islands. 

Neustadtgoedens, Ost Friesland
Since I will be separated from my beloved sewing machine and art supplies  for the 6 weeks that it will take for our stuff to make it by cargo ship, I may not be able to post very often.  I have plenty of ideas on hold, though.  As soon as we get settled and I get my creativity unpacked again, I'm sure I will be posting up a storm. 

Thanks for your patience and wish us luck!
 
Kelley

Wednesday, January 11, 2012

Cars and Trucks Padded Toddler Headboard

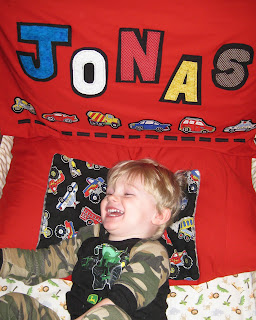
Jonas enjoying his new headboard and pillow
My son loves cars and trucks.  He just can’t get enough of them.  This morning, as an example, he wanted to watch the documentary Mighty Machines instead of Barney or Elmo.  That says a lot.

For Jonas’s second birthday, I decided to pimp his crib and make it more toddler-friendly since he is still not ready to have the sides removed, yet.  However, with Christmas and our family planning for a big move from California to Germany, I didn’t have time to work on the project. I had looked at toddler beading, but the majority of it was 60–100% polyester.  I bought the Disney Cars beading once, but took it back because it seriously felt like a shower curtain. 

Last night, I decided it was time to take action and make something myself.  When we were in Germany over Christmas, Jonas fell in love with big fluffy down pillows.  Previously, he had only been using the baby pillows that I had made him a year ago (Baby's First Pillows, 3/2011).  As soon as we got home, I bought him one for his bed with a bright red 100% cotton pillowcase.  One big advantage to this pillow is that ever since he started sleeping with it, he stays in one place at night instead of moving around his crib like a bumpercar.  I decided to use the second pillowcase for my project.

This toddler headboard is super easy to make.  There is a flat pillow in the pillowcase which can easily be taken out so that you can toss the whole thing in the washing machine.  The snaps/loops on the side make it a breeze to take on or off the headboard and it can be used on a crib or toddler bed.

Here’s the How to:

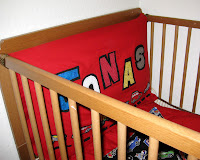
1.  First you will need a pillowcase.  If you have a standard crib, ours is from IKEA, then a standard pillowcase will fit perfectly on the headboard.  I bought a cotton pillowcase in the adult section, since the kids bedding, like I said above, has a lot of polyester in it which can cause overheating, sweating, and heat rash.

2.  Sew a loop of ribbon, about 10-12 inches long, on each side of the pillowcase about 2/3 of an inch from the top.  I cut a hole on one side of the case and pushed the ribbon into the case before I sewed it shut.  Add snaps to the end of the loop and on the inside of the pillowcase as shown.  You may want to measure your crib before you do this just to make sure that your headboard hangs straight and doesn’t sag in the middle.  If your child already has a toddler bead and no sideboards, you can measure the loops so that they fit over the poles of the bed.

3.  I have a lot of scrap material, so it was not difficult for me to find some that already had cars and trucks on it.  You can also make your own vehicles, if you’d like.  I took all of the material that I wanted to use and ironed some heat-bonding material, like Wunderunder, onto the back of it.  Then I used a washable 
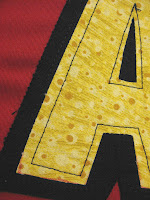
Crayola marker and drew the letters to Jonas’s name on the material.  I cut out the letters and vehicles.  Then, I took the letters and laid them onto some black felt which also has heat-bonding material on the back and drew them slightly larger.  I cut out these letters and the dotted lines for the street.  Finally, I ironed on the felt first and then the rest of the material cut-outs onto the pillowcase.

4.  Since heat-bonding material doesn’t last well through many washings, I went in with my sewing machine and sewed around all of the cars, trucks, and letters.  I also sewed a straight line through the dotted street line.  This is an important step, since toddler bedding needs to be washed a lot and even a headboard will get dirty and dusty. 

5.  Now add the pillow in the pillowcase.  If your pillowcase bunches open on the sides, use snaps or Velcro to hold it in place.  Hang your padded cars and trucks pillowcase onto the headboard of your toddler’s crib. 

You are finished!  Now, you can take off all of those baby bumpers (I'll do this as soon as Jonas wakes up. Goodbye Safari bedding!) and let your child feel a little bit bigger. Yeah! 

Thursday, January 5, 2012

Toddler Identity Band

Traveling with little ones is tough, especially with long layovers in airports and jet lag. This trip, I was worried about our two-year-old Jonas.

What happened if we got stuck in an airport somewhere and he ran through security or somehow managed to run away from us in a crowd?

He’s really fast and doesn’t like to sit still (see picture of him on the plane) I knew I couldn’t just put him on a leash and that he would want to run around.

As it happened, we ended up missing a flight and spending five hours in Salt Lake City after having been awake for almost 24 hours. Although I watched him like a hawk, my husband and I were really tired and watching our baby Lukas as well.

This identity band helped to keep me calm, knowing that if for any reason Jonas got separated from us, the airport would be able to identity him quickly. Being two, he was still too young to say his full name and would probably say his name was tractor or auto. Thankfully, he never got away from us, but I saw many times how easily it could have happened and I’ve heard from many people just how horrible it is when you lose your child somewhere.

Although this identity band is pretty simple on the outside, you can easily add a sticker on the inside with telephone number and address if wanted and thanks to the snap it can’t be pulled off easily by a toddler. 

How to:

1. Measure the width of your child’s wrist and cut one piece of light-colored material out this length plus about a half inch and another piece using a darker fabric twice the length plus an inch. I used white and blue for contrast and made the outer blue piece about four inches wide and the white piece about two. The blue material is leftover organic flannel, which is nice and soft on the skin.

2.  I used embroidery thread and quickly sewed Jonas’s name and birthdate in the middle of the white material. Then, I folded the white material in twice and ironed it flat.  If I had had more time, I’m sure I could have sewed it neater, but I kind of like the crooked look that came out of my lack of time.

3. Cut your dark fabric in half so that you now have three pieces of material the same length. Now sew the light colored fabric with the name of your child onto the middle of one of these strips. I sewed the white piece onto the blue using matching blue thread.

4. Put your other dark piece of material face down onto the one you just sewed and sew around all three pieces together leaving only about an inch opening. Turn your material inside out. Sew this shut by hand, or go around one more time with the sewing machine about an eighth of an inch from the edge as I did.

5. Finally, wrap the band around your child’s hand and mark where it closes. Add two snaps (I prefer the kind you push or hammer in) and your identity band is finished.

Time to fly!