Showing posts with label crafts. Show all posts

Monday, November 21, 2022

An Elf Erased My Picture

An Elf Erased My Picture book cover by Kelley Donner
This year, my kids and I decided to join forces and create a children’s book. The result is An Elf Erased My Picture, a story about a mischievous elf who grabs an eraser off a shelf and begins erasing a boy’s picture as he jumps around the page. My 8 and 11 year old helped by drawing the illustration for the boy’s picture. I drew the other illustrations. It’s a fun read aloud and at the end, you can help the boy to draw back his picture. 

Santa and his sleigh. Image by Lukas Donner, age 7.The idea for this book actually came from a Christmas card that my son Lukas, who was then only 7, made using linocut. It was a cute little image of Santa on his sleigh with four reindeer. I always loved this card. At the time it made me realize that no matter how hard I might try to draw something childlike, no one is better at making adorable childlike images than an actual child. Therefore, when I got the idea for An Elf Erased My Picture, I realized that I was not the best person to draw the boy's picture.

A boy looking at his picture from the book An Elf Erased My Picture by Kelley Donner
My first thought was to have my son Lukas, who drew the original Christmas card I like so much, draw the boy's picture. However, he was no longer a little kid. Lukas is already 11 years old and 11 year old's like to draw things realistically. I also didn't want to ask him to draw as if he were younger. Luckily, I also had a younger child in the house. Max is only 8 and also loves to draw. So I asked Max if he could draw me a picture of Santa and his sleigh flying over a house. I showed him his brother's Christmas card to give him an idea of what I wanted. And man did Max deliver! His image was fantastic and just what I needed for my book. Because both brothers were actually involved in the inspiration and creation of this book, I added both their names to the dedication (Older brother Jonas already has a book dedicated to him, so he didn't mind). 

An elf sliding down a snowdrift on a snowboard into a cat carrying an eraser from the book An Elf Erased My Picture by Kelley Donner
My second challenge was time. I had a great idea, a boy's picture, and a text that I quickly spit out at my computer, but I still needed loads of editing and illustrations. Why don't I think of Christmas ideas sooner? I decided not to waste any time and I drew and painted all of the illustrations within a week. Then I got my mother on the phone, the best rhyming editor out there, to help me refine my text. Somehow we were able to get the whole thing put together in only three weeks. An Elf Erased My Picture was ready, just in time for the holidays.

An image of a boy advertising the book as a stocking stuffer taken from the book An Elf Erased My Picture by Kelley DonnerI think it makes a great gift for teachers as well as for little budding artists and Secret Santa. You can get it currently on Amazon or order from your favorite book sto
re. Here is the ISBN: 978-1-955698-02-03 and the link for more info: 
https://www.kelleydonner.com/an-elf-erased-my-picture


Monday, October 5, 2020

How to Make a Realistic Island Model

This past weekend we had the most dreary weather imaginable - cold, wind, and drizzle all day long, perfect weather for getting creative. My ten year old son had an assignment for school to create a realistic model of an actual island. This couldn't be a made up island, it had to be an actual replica, so we decided to take on the challenge. Everything in the island was made made from stuff we found around the house including cardboard, aluminum foil, sponges, glue, Modpodge, and paint.

My son loves Jurassic Park and wanted to do Isle Nublar even though it is not an actual island. Therefore, after much discussion, we decided that making a replica of the big island of Hawaii, where most of the film was shot, was the next best thing. After explaining to him that we could not make the model as big as our kitchen table, we compromised on making a replica about as big as a piece of A3 paper. 

All three of my boys got really into this project and helped out. In the end, they were all really proud of their work and thought that their island looked about as real as it could get it. I was very impressed. If you want to make one of your own, here's how.


How to Make Your Island

Step 1: Making the base

We began by looking through images on Google for pictures of Hawaii. We finally found a topographical map of the island and printed it out at the size we wanted.Then we cut out a few of the main layers from the page and used them as patterns for cardboard cut-outs. For the mountain peaks, we crumbled up aluminum foil.

For the water, we used a base of cardboard.  Don't forget to trace the area in the middle where the island will go later. Then glue rolls of aluminum foil to make waves and hot glue them onto the base. Try to make the waves look as if they are crashing toward the island. When you have made enough, take another piece of aluminum foil and press it over the entire base.

Monday, July 27, 2020

The Dino Hunt

A little while before lockdown began, my boys and I went to a dinosaur museum to sketch. As an illustrator I’m used to bringing my sketchbook along to places to draw, but this was the first time that I took my sons along to draw with me. My oldest son Jonas, who is ten, is already an avid paleontologist. His enthusiasm for the subject had rubbed off on his two younger brothers, age 6, and 9 who were also excited to learn more about these huge animals that once roamed the earth.

Time to Sketch

We headed off to the Sedgwick Museum in Cambridge, UK which in addition to having a few complete skeletons, is also so old that it is easy to imagine walking its aisles a hundred years ago looking for drawers full of bones. We walked around the museum for a few minutes until we found a fossil or skeleton that we wanted to sketch, pulled up some chairs and started drawing. It was a wonderful experience. My usually rambunctious boys were quiet and concentrated. They also wanted to learn how to sketch shadows and tips for proportions. There were no complaints and they all agree that we should sketch again another time. After a couple of hours we left with our heads full of dino ideas.

I was very impressed with my children's drawings. Of course, as their mother, I am a biased observer. Nevertheless, I loved how much attention they paid to the use of shadow and shape. The most realistic drawings, in my opinion, were from my ten year old son in the middle. In addition to their drawings, I also made a few funny ones to add to the mix. Who doesn't want to see a dino with a handbag?

Looking for Fossils

When we got home, the dinosaur fever didn’t stop. Out on the playground, the boys gathered rocks and began making dinosaur fossils. Then they asked me to search the playground for bones like a paleoentologist and to try to figure out what dinosaur I had found. Was it an Allosaurus? A Pterandon? A Triceratops? I loved looking at their dinosaurs. It was not hard to imagine the broken rocks as bones left behind.

Now, in the midst of partial lockdown, I am reminded of our dino hunt. The playgrounds just reopened and my boys are glad to be free again to use more space than just our mini-backyard. They are all still big fans of dinosaurs. 

I think its time to go hunting for fossils again...  

Keywords: Dinosaurs, paleoentologist, sketching

Tuesday, March 31, 2020

Social Distancing Scavenger Hunt

In our little neighborhood in Cambridge in the UK, my children have a nice group of friends that they enjoy playing with after school and on the weekends. As for many children in the world at the moment, social distancing has been very difficult for them. Other than saying hello from a window or on a computer screen, they have not been able to play with their friends in two weeks and probably won't be able to for three months.

In order to make this time a little easier and to give them an indirect way to connect with the neighbor kids, my neighbor Michelle and I decided to start the Social Distancing Scavenger Hunt.

1. Getting started
In order to get prepared, the kids and I first picked up some large rocks on our morning walk, took them home, and then painted them. One of my boys painted dinosaur fossils on his rocks, my youngest just painted them with different colors, and my middle child had some funny ideas. I also painted a couple, including the very simple sleeping rock which is covered in the letter z. Once the rocks were finished, we put a sealer on them.

2. Hiding rocks
Then, on our next walk, we chose 8 large rocks to hide along the way and as we hid them we thought about clues and wrote them down. For example, one rock has the word "rabbit" written in brown on it. This rock we hid under a large white round sculpture in the dog park. The clue was, "Find the brown rabbit under the white planet." Another rock we hid close to the playground and made finding it like in a pirate's story, "go four paces forward, then five to the right..." Sometimes we made references to landmarks or street signs. It was fun making the clues. The final rock was put by our doorstep and I told my friend to ring the doorbell and we could say hi from the window. Then it was her turn to place the rocks and think up clues.

3. Precautions
If you are worried about cross-contamination and catching Covid19 when picking up the rocks, you can use an inverted plastic bag to pick them up (as if you were picking up after your dog). If you coat the rocks with clear nail polish or a good coat of sealant, then you can also wash them with soap and water. Make sure you always wash your hands when you come back inside.

I think you'll find that the more often you do a scavenger hunt with the same people, the more difficult you can make the clues and hiding places. I hope that you enjoy this idea. Please let me know what other ideas you have! Stay safe!

By the way, if this is your first time on my blog. Please check out my previous post about a children's book that I wrote and illustrated to help ease children's fears during this time. It's called The Day the Lines Changed and all proceeds go to Covid19 charities. For more info, see my website kelleydonner.com.


Thursday, November 7, 2019

Cambridge Printfair

This is just a brief note to let you know that I will be selling screenprints and linocuts next weekend at The Guildhall in Cambridge, UK.

 If you are interested in seeing some of my prints in advance, I have put a few of them online at https://www.kelleydonner.com/shop. I have made sure to make some that are as small as postcards, as I know that artwork is a wonderful thing to give at Christmas.

Thank you for your support!


Wednesday, March 6, 2019

Illustration in the Making

A Linocut and watercolor illustration

From inspiration 
to cover design

This morning at  the World Book Day event in my child's school, I was lucky enough to be able to help out with some creative writing workshops led by Debbie Edwards, a local author. Superhero stories were definitely something the children could relate to and I really enjoyed watching them enthusiastically being a part of the creative process and seeing how a story is made from start to finish.


As my children were also at the school and told some of their peers that their mother is an author/illustrator, at the end of the session one of the pupils asked how I did my pictures. When I look at children's books I often ask the same question and I wished I could have given my own workshop today on the subject (maybe next year). I also find it fascinating to see how other artists do their work and how they get from start to the finished product. 

Therefore, I would like to show the creative process that was used for the cover of my latest book Little Jack Thomson and his Magnificent Brain (For more info on Jack's story, please see my website kelleydonner.com).
First edition Jack

Jack, the main character, has changed a lot since I invented him. Originally, when I made the initial cover, he was daydreaming and lost in thought about his intergalactic space train and his dreams of mining rocks on Neptune. However, after awhile I realized that the cover made him look too melancholy and almost sad. He also looked too old for the children that I was trying to reach.

Since the book is uplifting, I did not want the cover to be anything less. Therefore, I went back to the drawing board and invented Jack again. This time I made him look enthusiastic and tried to convey a sense of pride. Although I think both the original and the final cover pictures are nice, the latter definitely gives the reader more of an immediate feel-good emotion. Books are often bought by the look of their cover, so I knew it was imperative that it grabbed attention and I think this Jack pulled the reader into his world in an uplifting positive way. Nevertheless, it was a long process to get there.

Here is my creative process for making a linocut/watercolor illustration:

1.  When I have an idea for a character I first begin by looking at stock photos online. For example, if the child should be withdrawn, then I would type in "withdrawn child" and see what images come up. If he should be proud, then I would look up words like proud, ambitious, determined, etc.. This helps to give me the general feeling I would like to evoke. Then I take the photos that I like best and incorporate them in my head with my own ideas and start drawing some sketches.

2.  Once I have the sketch that I would like to use, I transfer the drawing to a piece of linoleum or easy-cut lino. Then I begin the part of the process that I enjoy the most, cutting the lino. I find this to be very meditative and I love how the drawing takes on a new personality when cut out completely.

3.  Once the lino is finished, I make a print. Then after the print has dried, I scan it into the computer. I use various photo programs, but mainly Photoshop to improve on the print. I whiten the background and take out any unnecessary lines. Then I print this onto watercolor paper using my normal printer and the flatter back side of the paper. I am delighted to say that this works very well and most printer ink is permanent and does not run later during the painting process.

4.  At this point, I begin painting using watercolors. If I am unhappy with the result, I just use another printout and begin again. Sometimes, I will go over some of the lines again with a sharpie or black magic marker if the paint has washed over the lines and left the black too dull. This can also be done in Photoshop, but I often prefer the traditional method.

5.  Although watercolors do make beautiful colors, they are often not brilliant enough. This is why I usually scan the finished watercolor back into Photoshop and rework the picture a final time. As you can see here, I decided that the background was way too busy. The viewer has too many things to look at and Jack is lost a bit in this sea of colors. Therefore, part of the process of coming up with a final print is knowing what to cut out. I also cut out the planet at the bottom and one rocket.

6.  Now that my picture is finished, I can add it to a text program and begin making the final page. Here is the current draft cover for Little Jack Thomson's Magnificent Brain.

Unfortunately, when making a book, this is only the beginning. I have decided to try to do the entire creative process for Little Jack Thomson's Magnificent Brain from the text to illustrations to layout. I have already finished about half of the illustrations and I am currently playing around with some layout programs to see how I like the design. Even if I decide at the end, to send this book off to a publisher, I will feel better knowing that I know the process from start to finish. I am really enjoying making this book and I can't wait until it is finished and in stores near you.
To be continued...


Saturday, May 11, 2013

Grow With Me - Movable Door Height Marker

When did you get so big? I remember hearing that line when I was a kid all the time.  I never realized just how true it is.  Kids really do grow amazingly fast.

When my boys were born I was amazed just how tall they were.  Was it really possible for them to grow so much in only nine months inside of me? Then at their first birthday, I was amazed again at just how much taller they had become.  Now that they are two and three they have already become little boys and no longer look like babies anymore. Where did the time fly?

I started this movable door height marker over a year ago.  By changing the fabric every year, you can see exactly how much your child has grown each year.  You can also see which of your children will probably be taller.  Already at three, I can see that Jonas will be taller than his brother, even if it is only a little bit.

Hopefully someday, when they are over six feet and have stopped growing, have gotten married and have their own children, they can hang their door height marker up again and their kids can compare themselves to daddy.  

Lukas just had his two year check up where he had to stand up against the wall and get measured.  At home, he stood against his door marker and said, “so big!” Maybe someday, his son will do the same.

For the how to, see  http://kelley-donner.blogspot.de/2011/04/movable-door-height-marker.html from April of last year.

Wednesday, April 10, 2013

Baby Kitty's Underwear

Underwear is a big thing in our house.  My three year old Jonas not only loves to pick out which undies he wants to wear in the morning, but he also decides which ones his stuffed animals Baby Kitty, Mama Kitty, and Airplane get as well. 

I love Baby Kitty, because Jonas speaks through her.  When Baby Kitty doesn’t feel well, I know Jonas doesn’t either and when Baby Kitty is tired, I know Jonas is, too.  Baby Kitty even tells me all about Kindergarten.

So when I saw that Jonas’s underwear were way too big for Baby Kitty, I knew what to do. One morning while he was at Kindergarten, I sewed up a pair of undies for his beloved stuffed animals.

Jonas was so happy that his Kitty now had underwear that he showed everyone in his Kindergarten.  I think I am going to have to start making more clothes for Baby Kitty…

How to:
Unfortunately, I cannot show how I made these underwear.  I had such a limited amount of time and I had never made underwear before, so I did everything in the wrong order. Seriously, I've never found a project to be so difficult, which looked so simple.  Luckily, I’m pretty good at covering things up, so they still turned out pretty cute. 

If you want to make underwear for your kids stuffed animals, you could buy a pattern.  But, what would be the fun in that?

Wednesday, March 27, 2013

Big Boy Bedding


Before I had kids, I thought that you only lost sleep the first six weeks after a child was born.  Boy, was I naรฏve!  I never realized that sleep problems continue and change as children grow and their world expands.

My first born Jonas is already three.  He used to be a great sleeper, and then last summer the nightmares started.  First he was scared that a truck was going to drive into his room, then later he had a horrible fear of elephants.  In addition to this, his blankets were always falling off his bed and he would call out a few times a night, “Mama, tuck me in!”

The bedding issue was more complicated then it sounds.  Three year olds are picky!  Jonas has three blankets, one fleece, one fake down blanket and one crocheted.  He needs to have them on in that order, too.  Like I said, three year olds know what they want.

I finally decided to make him a new blanket that combined what he loved about the other three.  I knew that I would have to sell it well, or he wouldn’t accept it, so I worked hard at making it perfect.  I got blue fleece for the underside of the blanket and construction vehicle material for the other side.  I put a slit on the bottom where a down blanket could be put in for more warmth in the winter and added a piece of extra material that could be tucked under the mattress so that the blanket wouldn’t fall off. 

Luckily, the nightmares have gotten a bit better as he has started to understand the difference between reality and dreams and he’s not waking up as often as he used to. Jonas also loves his new blanket.  He is entirely capable now of tucking himself in, although he prefers to do it with one leg always on top of the blanket and one underneath. I don’t mind, as long as he falls back asleep.

I also decided that since I had the sewing machine out, I might as well make a blanket for Lukas, too.  He is now getting old enough to like a blanket and be capable of keeping one on at night.  Lukas's blanket is a bit smaller and can also be used as a duvet-cover, only I did not add the extra flap on the bottom.  As you can see on the pictures, both boys loved their comfy blankies.

How-to:
1.  This blanket was actually very simple.  First, measure the duvet that you are going to cover and add at least an inch and a half around the side.  The underside of your blanket, I used fleece, will be this size.  Then measure the top of your blanket, I used construction material, but add an extra 18 inches to the length (this is the flap that you tuck in under the mattress later).  For an added touch, I cut a strip of the construction material and sewed it on to the length of the fleece before I cut it, so that when the bedspread is folded over, you see both fabrics. 

2.  Now, sew the bottom end of the fleece and the flap of the top material by folding over the edges of the material twice and making a nice seam. 

3.  Lay the two pieces of material on top of each other with the good sides facing each other.  Pin all edges.  First sew the bottom of the fleece where you have made the seam to the top material about 10 inches in on both sides.  This hole is where you can add the duvet later when the weather gets cold.  You can add snaps if you want so that the duvet stays inside.  Then sew the other three sides of the blanket together and turn back righ-side-in.  For a finishing touch, iron the blanket flat and sew around the edges from the outside one more time.  Your blanket is finished!  Good job!

Tuesday, November 27, 2012

Blessings Countdown Calendar - Guest Blog

I just love this Advent Calendar from Jen's Ink Spot!  It has such a personal touch and fits in with the true spirit of Advent. Instead of chocolate or little gifts, it shares blessings that the family has received throughout the year.

Behind each number card is a photograph representing a memory. These cards can then in turn be hung as ornaments on the tree. When Christmas is over, the cards can then be put in a scrapbook to show blessings from the past year. What a great way to share Advent with your children!

I’ve been friends with Jennifer since the fourth grade, and I’m so proud of all of her creative accomplishments. Her blog Jen's Ink Spot has great ideas for how to make cards of all kinds. If you would like to check it out and see how to make this fantastic Advent Calendar, just click on this link:  http://jensinkspot.blogspot.de/2012/11/blessings-countdown-calendar-with-lil.html

Have a wonderful Advent!
Kelley

Monday, September 24, 2012

Rainy Day Driving

The German rainy season has now begun.  Even though my children both have plastic overalls, rain jackets, and rubber boots that they can wear outside when it's muddy or drizzling, some days it just rains too hard.

Lukas is now 16 months old and he loves to ride his bobby cars (see picture of Lightning McQueen car) all around our neighborhood. Unfortunately, since Lukas has been driving his car outside all summer, the tires are all worn and rough. Most homes here have wood floors, not carpet, so those tires would easily leave a bunch of race track scratches all around the house.

Therefore, I decided to make Lukas's car inside-proof! I cut strips of flannel (felt would work, too) and glued them around the tires.  Then I added a strip to the front for a bumper.

This was a very simple project that made my son very happy.  He can now drive his car all around the house, which is good for his health and my wood floors.

Tuesday, July 24, 2012

Bed to Crib Baby Pillow


My boy Lukas loves to cuddle, so I hated laying him in an empty crib. Although I used to think that babies should always be in their cribs, Lukas somehow always managed to make it into our bed.  I guess, things change when you have your own kids. 

Our relocating didn’t help the situation either, as often the only place for him to sleep was next to us.  Now that we are settled in, though, it’s time for him to finally move to his crib for the long haul.  I know this won’t be easy, as he is already almost 14 months old, but he’s just getting too big.  

I needed something to make the change a little bit easier.  I’ve tried giving him a stuffed animal, but he just thinks they are funny and then throws them out of the crib. 

I know, however, that as soon as he wakes up, he starts reaching out for anything to give him comfort, usually a piece of my hair or a pillow that smells like Mommy and Daddy. 

Therefore, I decided to make him his own pillow.  This pillow he can use in our bed or his, so that it stays the same (and smells the same) no matter where he is. 

As you can see from the picture, it sure looks like Lukas likes his pillow.  Let’s just hope he likes sleeping by himself, too. 

How to:

1.  For this pillowcase, I used the material from an old beige sheet made of 400 count Egyptian cotton.  Lukas is used to our pillows, so I figured a sheet would be similar material.

2.  Next, I measured out a piece of material to fit the baby pillow that I bought at Ikea.  I laid the material on the table, put the pillow in the middle, and then folded it over the pillow making sure  that there was about 6-8 inches of overlap in the middle.  I decided not to put a zipper or a button as closure, but to use a fold instead.

3.  Next, I took the ends that will be part of the open fold and sewed them closed like you would the bottom of a curtain.  I doubled them over and sewed the hem twice. 

4.  Then I laid the material down on a table upside down, folded it over like I had over the pillow before with the material overlapping in the middle about 6 inches and pinned the edges together.  I sewed around all of the edges.  Then I turned the pillow back right side in using the open fold.  The pillowcase is finished.

5.  Finally, I drew a picture on the pillow of a dumptruck using fabric markers.  You can also fill in your picture with color, but I actually like the black and white of this picture.  Maybe someday I’ll let Lukas color it in himself.

6.  Put your child to bed on his new pillow and watch him sleep.  Zzzzz…

Sunday, July 15, 2012

Photo Calendar Wall Hanging

Do you make calendars for grandma and grandpa every year? We always make ourselves a copy as well.  It's so nice to look at the pictures throughout the year.

And yet, it's a calendar.  I won't be hanging it up again.  The year is finished. There will never be a 2011 again.  I should just throw it away.

But, I can't bring myself to trash it.  These are 12 pictures that I chose out of hundreds.  These are the cream of the crop, the best photos.  Hmmm....

Then I had a great idea. I decided to make a wall hanging.  Jonas's room is under the roof, so part of the wall is really slanted.  I love to hang up pictures, but I'm not about to hang up frames on a slant.  Not only is it too dangerous, but I don't even know how you would do it.  This calendar wall hanging is perfect for such a wall and the slant makes it easy for kids to see the pictures.

Jonas loves his wall hanging and often wants to talk about the pictures and all of the interesting places that we've seen throughout the year.  This calendar is so easy to make and looks great on a wall.  You can easily finish it in one afternoon or evening.

Here's the how to:

1.  Cut all of the pictures off the calendar so that they are the same size, usually about the size of a piece of paper.  Then punch a hole in each corner with a hole puncher.

2.  Lay out all of the pictures on a table like you would like to have them on the wall.

3.  Cut pieces of string about 6-8 inches long.  Then making sure your knots are about the same on every corner, tie the pictures together making a checkerboard.  Also, tie strings to each of the four corners.

5.  Pull your pictures taut across the table and then measure the distance vertically and horizontally.  Add an inch to each measurement and then drill holes in the wall (we have brick walls here) and screw in a hook facing outwards into each hole.

6.  Finally, take the strings which are tied to each of the four corners of your wall hanging and tie them tightly onto the hooks in the wall. Finished!  Doesn't it look fabulous?


Friday, June 10, 2011

Homemade Travel Crib Mattress Pad

My husband and I decided to get a baby travel crib to use as a baby crib for Lukas’s first few months. Our apartment is not very large, and a travel crib has a lot of advantages: Firstly, it doesn’t take up much space. Secondly, you can push it around from room to room. Thirdly, it is much cheaper than a brand new bassinet/crib. And, finally, it’s high enough that our 19 month old can’t reach well into it. The one disadvantage? The mattress was very hard and sunk in a bit in the middle.

The solution ended up being a combination of flattening out the bed by adding a piece of cardboard and a blanket under the mattress and adding a mattress cover. The problem was only that they don’t make mattress covers for baby travel cribs. Therefore, I decided to sew one up myself.

I decided to use a similar concept to the baby pillows that I made for Jonas. They have just enough fluff to be comfortable, but are flat enough to be safe. I also added some fold over corners to the cover so that it would stay on the mattress, another safety guard.

I think the resulting cover is so cute, it is really a shame that you have to put a sheet over it. Maybe, when he’s a bit older, I’ll just leave it in the bottom of the playpen.

Here’s the quick and easy how to:

1. Measure your playpen/travel bed so that you know how big to make your mattress cover. Then cut out 2 pieces of material, plus 2 pieces of thin polyester backing adding a half inch to each side.

2. Now cut out 4 square pieces of material, about 8 x 8 inches. Fold material in half with the nice side on the outside.

3. Lay down the pieces as follows: First one piece of material with the good side facing up. Now add the triangles to each corner, so that the two open ends of the triangle are facing the corner. Then, add your next piece of material with the good side facing down. Finally, lay the polyester backing down on top. If you have difficulties sewing over polyester backing, add a layer of newspaper to this, which you can tear off later. Add stick pins around the entire square to hold.

4. Leaving about a half inch all the way around, sew around the rectangle until you are about 4-6 inches from where you started. Now turn the entire piece inside out, so that the right side of the material is now on the outside, and the polyester backing on the inside. You will see that the triangles can be folded to either side.

5. Finally, sew up the remaining 4-6 inches by hand and you are finished.

When I added this mattress pad to our crib, my baby finally slept “like a baby.” If you need a temporary crib or travel a lot, consider making your own mattress pad.

Friday, April 29, 2011

Movable Door Height Marker

When I was a little girl, the door frame to my bedroom was covered in marks depicting not only my height at various ages, but also the height of my friends and even my stuffed animals. Even after I stopped growing, I loved looking at it and seeing what years I really shot up and who I was friends with at different times. There was so much history on such a short little space.

Now that Jonas is getting older, I wanted to have a place where I could also mark his height. Unfortunately, I've moved so many times in the last few years that I really doubt that it makes sense to use a door frame. So I decided to make a door height marker that I could take with me from one place to the next.

This movable door height marker is made out of material and is a bit different than the one on my bedroom door. I love the visual of seeing how much one grows during each year, because it varies so greatly. Therefore, I decided to cut and sew a piece of material for the first year and then to add pieces of material which extend from this piece for every year after that.

At the moment, I only have two pieces of material for Jonas, since he is only 18 months old. The first is 21.3 inches long, his birth height, and the second is 9.7 inches, since he was 31 inches at one year (21.3 + 9.7 = 31). On his second birthday, I will add a third piece of material to his marker.

This door height marker can be hung in a door frame, or hung on the wall until the child is a bit older. If you have more than one child, you could hang them next to each other to compare heights. Maybe someday I will sew this one into a quilt and give it to my child when they go off to college, have their own child, etc...

Here is the how to:

1. Cut a piece of material which is four and a half inches wide and so long as your child was at birth plus at least a half an inch. Turn the insides of the material together and sew along the edges with about a quarter inch remaining, leaving the top open. Now turn it back right side in, fold in the top edges a quarter inch and leaving the top open, sew around these edges or iron them down with heat bonding tape. Iron flat.

2. Iron Wonderunder to a contrasting fabric and then cut out the name of your child and how tall they were at birth. Iron this onto your material. Your first piece is finished!

3. For every year your child is old, add another piece of contrasting material and the age of the child. Eventually, your door height marker will be very colorful and a great way to remember how small your child once was.

Friday, April 8, 2011

Floppy Dog

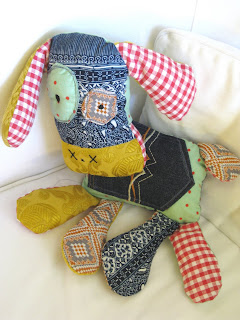
This is one of my first sewing projects after getting pregnant with my first child. My husband and I knew that we would be moving the same month the baby was born and I wanted to get rid of as much clutter in the house as I could before we started packing. I had a bunch of scrap material that I decided I didn’t really need. Nevertheless, as an artist, it is sometimes hard to part with things that you have collected for future projects (whether or not these projects ever occur) and so I decided to sew up a few things first.

The idea for Floppy actually came from my childhood and memories of my Grandma Hilda who used scraps to make everything from blocks to stockings. I decided that a stuffed animal would be a good gift for me to give my child and that using the old material would be a sentimental way for me to remember my pregnancy and the anticipation of things to come.

Here is the how to:

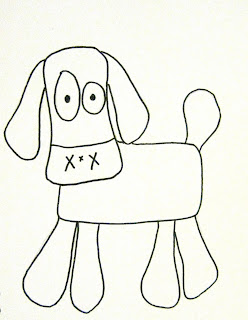
1. I first drew a picture of what I wanted to make. I decided on a dog (although it has some similarities with a cow as well). You can use any animal, just make sure that you keep it simple. My dog basically has 3 parts: a rectangle for a body, a rounded rectangular head, and limbs/tail/ears plus your extras like eyes/pockets. Once you have drawn your animal, make patterns for each of these parts, making sure to leave about a half an inch of material anywhere you will sew.

2. Now decide what material you will use. Cut out the pieces according to your patterns, and then arrange them on a table so that you can see what your animal will look like from the front and the back. I like to really mix my fabrics, making sure that at least one piece of each fabric is on the front and the back of the animal.

3. Now you can start sewing. I prefer to start with the limbs/tail/ears. They are really easy, as you only need to lay the two pieces of material with the good sides facing each other and then sew around the edge leaving the limb open where it will connect to the body. Turn back right-side-in and then stuff with polyester filling. You may need to use a pencil to really get the filling into every corner of the limb.

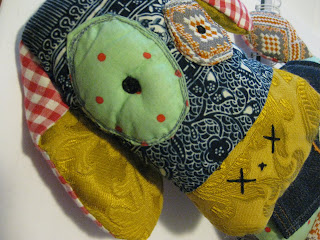
4. Once all of your limbs/tail/ears are finished, it’s time to work on the head. First add your eyes. You can either sew these on by hand, or you can do them with the machine. I usually fold the edges of the material first and iron them flat. Then I sew around ¾ of the eye using the machine, stuff in some polyester filling, and then sew the eye shut. Finally, I sew the pupil using dark thread. If you do other accents, like making the head out of two different pieces of material, or adding X’s for nose/mouth, then you will also need to do this now. Now you can lay your two head pieces together, using stick pins, place the ears where they should go, sew around the whole head, and stuff it like you did the limbs. Since I sewed my head directly on the front of the body, I made sure to finish the head completely, hand sewing the final hole shut, where I had added the stuffing.

5. Now, it is time to get the body ready. I have added a pocket accent to my Floppy dog. This is just a pocket from a pair of jeans. You can often buy loads of them at your second-hand store. I like to use them on projects for fun. After sewing on the pocket, you will need to use stick pins and pin the head on where it should go. I sewed the head onto the body by hand, since I wanted it to lie on the front of the body (If you have a neck on your animal, this won’t be necessary, as you can sew it directly into the body). I made sure to sew it on really well, as I wanted to make sure that my son wouldn’t be able to pull it off.

6. Finally, I took the body and using stick pins, I placed all of the limbs/tail where they should go. Then sew around the whole body leaving only a little opening about an inch to an inch and a half wide. And, now for the fun part. Once you turn your animal back right-side-in, it is almost finished. All you need to do is stuff the body, and sew up your remaining hole and you are done. Yeah!

In the end, although it may seem like a long process, you will be amazed just how fast everything goes. I made Floppy in one weekend and was surprised just how easy it was.

If you have made similar stuffed animals, please post them. I’m always excited to see what others are creating!