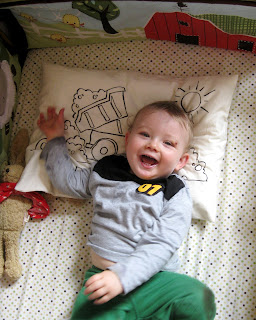
 My boy Lukas loves to cuddle, so I hated laying him in an
empty crib. Although I used to think that babies should always be in their
cribs, Lukas somehow always managed to make it into our bed. I guess, things change when you have your own
kids.
Our relocating didn’t help the situation either, as often
the only place for him to sleep was next to us.
Now that we are settled in, though, it’s time for him to finally move to
his crib for the long haul. I know this
won’t be easy, as he is already almost 14 months old, but he’s just getting too
big.
I needed something to make the change a little bit
easier. I’ve tried giving him a stuffed
animal, but he just thinks they are funny and then throws them out of the crib.
 I know, however, that as soon as he wakes
up, he starts reaching out for anything to give him comfort, usually a piece of
my hair or a pillow that smells like Mommy and Daddy.
Therefore, I decided to make him his own pillow. This pillow he can use in our bed or his, so
that it stays the same (and smells the same) no matter where he is.
As you can see from the picture, it sure looks like Lukas
likes his pillow. Let’s just hope he
likes sleeping by himself, too.
How to:
1. For this
pillowcase, I used the material from an old beige sheet made of 400 count
Egyptian cotton. Lukas is used to our
pillows, so I figured a sheet would be similar material.
 2. Next, I measured
out a piece of material to fit the baby pillow that I bought at Ikea. I laid the material on the table, put the
pillow in the middle, and then folded it over the pillow making sure that there was about 6-8 inches of overlap in
the middle. I decided not to put a
zipper or a button as closure, but to use a fold instead.
3. Next, I took the
ends that will be part of the open fold and sewed them closed like you would
the bottom of a curtain. I doubled them
over and sewed the hem twice.
4. Then I laid the
material down on a table upside down, folded it over like I had over the pillow before with
the material overlapping in the middle about 6 inches and pinned the edges
together. I sewed around all of the
edges. Then I turned the pillow back right
side in using the open fold. The pillowcase is finished.
 5. Finally, I drew a
picture on the pillow of a dumptruck using fabric markers. You can also fill in your picture with color,
but I actually like the black and white of this picture. Maybe someday I’ll let Lukas color it in
himself.
6. Put your child to
bed on his new pillow and watch him sleep.
Zzzzz…


