Wednesday, July 17, 2019

The Great Kid-friendly Bake-off!


I love baking with my kids. We also love watching those cheesy bake shows which make amateur contestants go against each other to see who can make the best (or worst) cake. This past week, my children and I decided to create our own show.

I got out enough bowls, wooden spoons, and equipment for each of my three children, gave them each 2 eggs, and ingredients. I had to film them each coming in to the kitchen, as they love to watch Youtube and wanted to have everything look and be commentated on as if were a real show.

Activity 1: Bake your own signature cake.

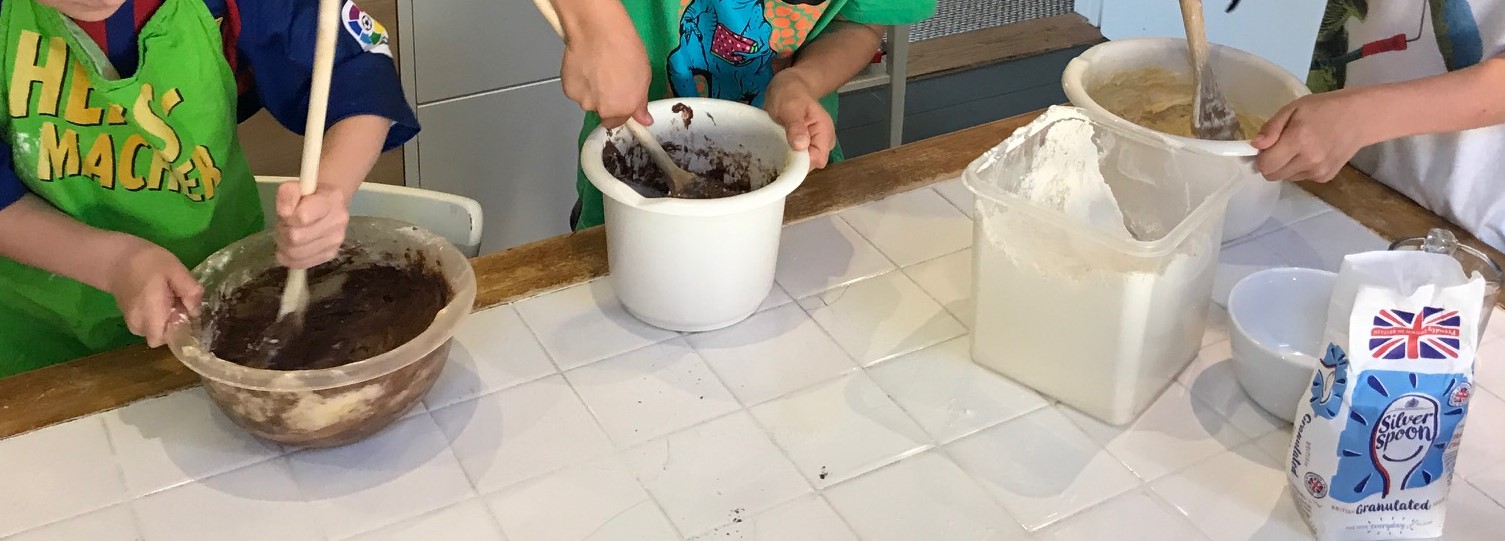
Three little hands mixing batter

Then they all got to work. I led them through the basics, but let them do the heavy lifting. They had to grease and flour their own pans, measure and stir their own ingredients, and design their own cakes. It was fun and we had a blast.

My youngest, who is five, took the whole thing really seriously. When asked what kind of a cake he would make, he replied, “A waterfall cake made of chocolate with a Spinosaurus on it.” Not an easy task, if you ask me.

Waterfall cake with Spinosaurus
They all worked really hard, and in the end I was really proud of each one of them. Jonas, who is now 9, made a dinosaur cake with fossils stuck in the frosting; Lukas, who is 8, made a chocolate happy face cake; and Max made his extravagant cake with a waterfall falling down a cliff made of rice cakes into a painted river of frosting.

Here are the final cakes and a recipe for only 1 round cake made with simple ingredients. I hope you enjoy yourselves as much as we did. This was a fantastic way for the whole family to get involved in the kitchen.

Recipe 1 Bake-off cake:

The final three cakes!

Ingredients:

1/2 C Butter
3/4 C Sugar
2 Eggs
1 t vanilla
1 1/2 C flour
1 1/2 t baking powder
pinch of salt
1/2 C milk
1/4 C cocoa (optional)

Your choice of frosting and decorations!

How to make the cake:

1. Have children grease and flour a round baking tin.
2. First have children mix together the butter and sugar. Make sure your butter is nice and soft so that the kids can handle it.
3. Show how to break an egg and then let each add 2 eggs to their butter/sugar mixture and mix again.
4. Add vanilla, milk, and all dry ingredients. Mix well.
5. If you are going to make a chocolate cake, add a 1/4 C cocoa to the mix and perhaps a little bit more milk.
6. Bake at 350* F for 20-30 minutes or until a toothpick comes out clean.
7. Let cool and then decorate to your hearts content.
8. Don't forget to judge the best cake!

Please let me know how your cakes turned out!


Tuesday, July 16, 2019

On the Ball for Autism

I wanted to share with my blog readers an exciting article about my new book series which was published in the Cambridge News. It was exciting to receive such support from the community. Here is the entire article:

A new book series designed to empower children with special needs has become a hit with readers.

The Happy Heads series, by Trumpington based American children’s author and illustrator Kelley Donner, made its debut two weeks ago, and has already topped Amazon’s Special Needs Children’s Health bestseller list.

The first book in the series, Ball! Ball! Ball!, tells the story of a lively young boy with autism, who speaks only a few words and has a fascination for round objects and discovering new things. The second book in the series, Little Jack Thomson’s Magnificent Brain, is set to be published in the autumn, with the third and fourth books in the series currently being illustrated.

Speaking to the News, Kelley Donner explained why these books were necessary, and why stories focusing on characters with special needs should always strive to do more than just raise awareness.

She said: “I started work on these books ten years ago, but since moving to the UK, I’ve had more time to focus on creating the stories. It’s my belief that every child has the right to see themselves represented in the books they read, but the standard approach to characters with learning difficulties is very problematic, if they’re represented at all. “Most books are solely about raising awareness of autism, or children on the autistic spectrum, and are centred on a character who doesn’t have that condition learning about them. It creates the “Rain Man” effect, and in many cases furthers pre-existing stereotypes, when there are a broad range of behaviours on the spectrum.”

Kelley explained how the Happy Heads series would correct this. She continued: “I wanted to tell more complex children’s stories about children with autism, where they aren’t defined by their disability. There’s little representation like this in the picture book market - I asked various groups on Twitter if anybody had any examples, and people were struggling to name any. “I want the characters in these books to be less perfect, so children can see themselves. I’ve had a positive response from the autistic community, and I would love to start visiting schools to share this story and the ones I have coming up with children.

“My next book, Little Jack Thomson’s Magnificent Brain, will be out later this year. The aim with that book is to challenge stereotypes surrounding Asperger’s, as all representation highlights the intelligent children with Asperger’s, ignoring the more diverse spectrum of people with that condition.”

Kelley will be reading and selling copies of her book at The Big Weekend's Big Read tent on Parker's Piece at 3:20pm on Saturday, July 6.

Ball! Ball! Ball! A Picture Book to Inspire Sensory Awareness is now available to order on Amazon. More information on the Happy Heads series can be found by visiting kelleydonner.com.

Written by Alistair Ryder


The Big Read - Cambridge

Story-time at local libraries and events is a wonderful way to connect with children and to see how they relate to your material.

This past week I got to read some of my books, including ones that I haven't published, yet, at an event called The Big Read in Cambridge. It was part of a big festival called Cambridge Weekend and I found out about it from the Society of Children's Book Writer's and Illustrators.

Although the weather didn't cooperate the whole day, it was a great day. I met a lot of other local author and illustrators, had fun with the children, and met many parents. I also found out that I am going to have to find a way to publish my book, Draw Me Happy, because the children loved being able to draw the illustrations directly in the book.

I look forward to doing more reading events in the future!

Thursday, May 16, 2019

Sensory Fun at Bangabandhu Primary School


This week I visited Maddi Outram’s special education class at Bangabandhu Primary School in London. 

Maddi has been using my book Ball! Ball! Ball! for topic this term in her class. As many of her students are autistic and have sensory processing issues, Ball! Ball! Ball!  offered various possibilities for tie-in activities and sensory fun. Her students are between the ages of 5 and 9.

For those of you who are unfamiliar with my book: 

Ball! Ball! Ball!  is about an autistic boy named Tom who is obsessed with all things round and enthusiastically points out any object he can find that looks like a ball. From peas to balloons, Tom learns that “balls” can be smooth, squishy, pop, and even have different temperatures.

Maddi read my story to her class and then made various tie-in activities based on sensory play. She collected variations on all of the objects in the book, such as a rock, a round lamp, bubbles, etc. and placed them in a basket to be used as needed. 

Just as Tom is excited about the peas on his plate, Maddi made a table full of peas and let the children play and squish them as they wished. For science and physical education, they rolled and threw different balls. She even filled a trampoline with balloons and let the children jump in them. I think she is doing a wonderful job and it is clear that the children all really enjoy being in her class. I'm thrilled that my book is being used in such a positive way.

On the day I visited, we decided to do a sensory bag activity. I placed a round object, such as a ball, round Lego tire, marble, roll of tape, etc. into a bag and let each of the children feel the object with their hands. Many of the children wanted to see the object and take it out of the bag.

After this, I read Ball! Ball! Ball!  to the class again. One of the pupils who had been stimming with his hand in front of his face the entire time, stopped stimming for a little while. This made me happy, as this was the child that Maddi had told me loved balls more than anything. Another child sat very close to me and wanted to touch the page that I was reading. Although I received very little eye contact, I could tell that most of the students were listening and taking part in their own way. Having written a story about an autistic child, it was wonderful getting positive feedback from children who could directly relate to Tom's character.

Finally, we made a fabric collage together of a scene from outer space using a simplified version of the collage technique that I used for Ball! Ball! Ball! I brought pieces of scrap material and stencils and we glued the material onto a piece of poster board. The children needed some help with using scissors, but they all worked really hard and together we finished a nice piece of artwork. 

I really enjoyed visiting Maddi’s class and the staff at Bangabandhu Primary School were all very friendly and helpful. I love being an advocate for children with special needs and autism and I look forward to visiting more schools in the future. I am also planning on adding a lot of Maddi’s sensory activities to my webpage along with some ideas for sensory play so that other teachers can benefit from her creativity and dedication.

Ball! Ball! Ball!  is in the process of being published and will be available on Amazon in June of this year. The ISBN number is 978-1-73-395951-3. Please contact me if you would like to pre-order a copy and if you enjoy my books, please leave me a positive review on Amazon. Thank you.


Monday, April 29, 2019

Oak Tree Mural


Goodbye drab grey stairwell!
Hello sunshine!

This past week I got the opportunity to do a huge mural of an oak tree in the stairwell at Oaks International School in Cambridge, UK. Lately, I have been spending most of my time either cutting out linocuts or sitting in front of Photoshop on the computer, so I loved being able to get out and get my hands dirty.

I decided to use a technique for the oak tree that I used on a previous mural using painters tape to mark off the lines.  I think this makes the image look as if it has actually been cut out, like the linocuts that I so love to make. I also used wallpaper to make leaves in order to give the tree a bit of texture. Here are the steps that I used in order to plan, create, and finish this gigantic tree:

1.   First, I needed to plan my design. I took a lot of photos of oak trees and branches and some pictures of the stairwell on my phone and then used a basic drawing program on my Ipad to draw a few ideas over the picture. This also gave me the possibility to show my idea to the school for approval before I got started.

2.   Then, I bought all of the necessary materials and got to work. I used string and a bit of tape to layout my tree design onto the wall. This way, I had the possibility to lift a branch higher or lower with ease. As this stairway turns twice on its way up, it was important to see how the actual tree would look on the actual wall instead of just on my Ipad.

3.   Once I was happy with the design I began taping the branches and accents. I used the most expensive blue painters tape for fine edges because it makes a huge difference in comparison to cheap masking tape. Even with the best tape, there will always be some places where the paint comes off the wall, but there is nothing worse than having most of the paint come off with the tape. Blue painters tape is also easy to use.


4.   With my tree all taped, I began the first round of painting. Before I put a paintbrush on the wall, I went around with my finger on all of the edges and made sure that they were down. This is very important, because otherwise paint will leak through the little bubbles on the side and look tacky. If you are really concerned about leakage, you can always paint the sides of the image with the background color once before you add your top coat. Any leakage will then be in your background color. Nevertheless, if you are good about making sure your edges are taped well, this is not necessary. Because my brown was not very opaque, I actually had to paint the tree twice. 

5.   After painting the tree, I added some accents for fun. I put an owl in the tree, a birdhouse on a branch, and some birds in the air. I actually had to stop myself from not adding more, as I realized my project would quickly get out of hand and never finished.

6.   Finally, it was time for the leaves. I bought some inexpensive paintable textured wallpaper and rolled out a few sheets onto the floor. I then painted these green. Once it had dried, I made my own stencils and cut out oak leaves in various shapes and sizes. I used basic wallpaper paste to then glue them onto the wall.

Eventually, the school would like to add words at different places throughout the tree with the core vales of the school, such as happiness, aspiration, and community.

The best part of the entire project was listening to the children as they passed by in the halls. They loved seeing the process and they were so encouraging. Seeing so many children happy with the result made it definitely worth the effort. I was very pleased with the result, because it looks, like I had hoped, as if it was printed on the wall. I look forward to doing another mural like this in the future.

The Oaks International School tree mural is also listed under current projects on my website: kelleydonner.com.


Going to Art School

I'm very excited to announce that I was accepted to the Cambridge School of Art at Anglia Ruskin and will be doing my MA in Illustration and Book Arts this fall.

Although I loved my liberal arts education, I have always dreamed of going to art school and I am really looking forward to getting started. I have already met some of the professors and other students and they were all very wonderful and helpful. Then again, here in England, I have rarely met anyone who is not polite and friendly.

I will be experimenting with illustration as well as increasing my knowledge of book design and dabbing a little in animation. I'm looking forward to what new things I will learn and how my art will develop. I'll keep you informed.

Wednesday, April 17, 2019

Happy Jar

I brought out the Happy and Sad jar the other day. I'm amazed they still work, even though the boys are getting older. Here is how it all started.

About the time that Lukas turned two, he decided it was time to hold his own against his older brother Jonas, who was three and a half.  Previously, if Jonas had wanted a toy that Lukas was playing with, he would bribe him with a different toy and all was well.  Now, his formerly easy-going brother Lukas would say no, hold onto the toy for dear life, and hit, bite, or scratch him if he tried to take his toy away. Unfortunately, since toddlers are good at retaliating, this often meant that Jonas would do the same thing back.

After a while I realized that things were getting out of hand and I needed to up my game.  The time-outs and conversations with Jonas were not working at curbing the fighting and I felt like I was saying no all of the time.  I didn't like all of the negativity and I didn't feel like it was working either. Nevertheless, I knew that Jonas was old enough to know better and I needed to do something to curb his behavior.  After talking to my mother, the best childhood expert I know, and looking on the Internet for ideas, I finally came up with the Happy Jar.

I took two small jars and labeled on with a happy face and one with a sad face.  Every time Jonas or Lukas showed good behavior, like being generous with their toys or snacks or playing nicely with each other for awhile, I would put an M&M into the Happy Jar (as long as there were M&M's in the Sad Jar, I would use them first).  When they fought with each other or were mean to each other, I would take one M&M out of the Happy Jar and put it into the Sad Jar.  After suppertime, we would count the M&M's in each jar, mark it on a chart, and then they were allowed to share the Happy M&M's (a small hidden mathematics lesson for Jonas at the time).

I tried really hard the first few days to find as much positive behavior as I could to try to motivate them to continue.  I was amazed how well the jars worked.  Jonas loved being able to collect the M&M's and would always report to me when he was being really good.  Even though at the end of the day, they never had more than 8-10 to share with each other, I could tell that Jonas was really proud of himself (Lukas, being only two, was of course not old enough to entirely understand the jar concept).

Although I will admit, it didn't stop the hitting and biting entirely, it did bring it down to an acceptable level that I could handle.  I only needed to use the jars for about a week. Children love getting rewarded. The best anecdote from the whole experience, however, came from Jonas one night at the very beginning when he went to look at the jars. "Look Mom," he said, "the Sad Jar is happy now, cause he has M&M's, too."

Wednesday, March 6, 2019

Illustration in the Making

A Linocut and watercolor illustration

From inspiration 
to cover design

This morning at  the World Book Day event in my child's school, I was lucky enough to be able to help out with some creative writing workshops led by Debbie Edwards, a local author. Superhero stories were definitely something the children could relate to and I really enjoyed watching them enthusiastically being a part of the creative process and seeing how a story is made from start to finish.


As my children were also at the school and told some of their peers that their mother is an author/illustrator, at the end of the session one of the pupils asked how I did my pictures. When I look at children's books I often ask the same question and I wished I could have given my own workshop today on the subject (maybe next year). I also find it fascinating to see how other artists do their work and how they get from start to the finished product. 

Therefore, I would like to show the creative process that was used for the cover of my latest book Little Jack Thomson and his Magnificent Brain (For more info on Jack's story, please see my website kelleydonner.com).
First edition Jack

Jack, the main character, has changed a lot since I invented him. Originally, when I made the initial cover, he was daydreaming and lost in thought about his intergalactic space train and his dreams of mining rocks on Neptune. However, after awhile I realized that the cover made him look too melancholy and almost sad. He also looked too old for the children that I was trying to reach.

Since the book is uplifting, I did not want the cover to be anything less. Therefore, I went back to the drawing board and invented Jack again. This time I made him look enthusiastic and tried to convey a sense of pride. Although I think both the original and the final cover pictures are nice, the latter definitely gives the reader more of an immediate feel-good emotion. Books are often bought by the look of their cover, so I knew it was imperative that it grabbed attention and I think this Jack pulled the reader into his world in an uplifting positive way. Nevertheless, it was a long process to get there.

Here is my creative process for making a linocut/watercolor illustration:

1.  When I have an idea for a character I first begin by looking at stock photos online. For example, if the child should be withdrawn, then I would type in "withdrawn child" and see what images come up. If he should be proud, then I would look up words like proud, ambitious, determined, etc.. This helps to give me the general feeling I would like to evoke. Then I take the photos that I like best and incorporate them in my head with my own ideas and start drawing some sketches.

2.  Once I have the sketch that I would like to use, I transfer the drawing to a piece of linoleum or easy-cut lino. Then I begin the part of the process that I enjoy the most, cutting the lino. I find this to be very meditative and I love how the drawing takes on a new personality when cut out completely.

3.  Once the lino is finished, I make a print. Then after the print has dried, I scan it into the computer. I use various photo programs, but mainly Photoshop to improve on the print. I whiten the background and take out any unnecessary lines. Then I print this onto watercolor paper using my normal printer and the flatter back side of the paper. I am delighted to say that this works very well and most printer ink is permanent and does not run later during the painting process.

4.  At this point, I begin painting using watercolors. If I am unhappy with the result, I just use another printout and begin again. Sometimes, I will go over some of the lines again with a sharpie or black magic marker if the paint has washed over the lines and left the black too dull. This can also be done in Photoshop, but I often prefer the traditional method.

5.  Although watercolors do make beautiful colors, they are often not brilliant enough. This is why I usually scan the finished watercolor back into Photoshop and rework the picture a final time. As you can see here, I decided that the background was way too busy. The viewer has too many things to look at and Jack is lost a bit in this sea of colors. Therefore, part of the process of coming up with a final print is knowing what to cut out. I also cut out the planet at the bottom and one rocket.

6.  Now that my picture is finished, I can add it to a text program and begin making the final page. Here is the current draft cover for Little Jack Thomson's Magnificent Brain.

Unfortunately, when making a book, this is only the beginning. I have decided to try to do the entire creative process for Little Jack Thomson's Magnificent Brain from the text to illustrations to layout. I have already finished about half of the illustrations and I am currently playing around with some layout programs to see how I like the design. Even if I decide at the end, to send this book off to a publisher, I will feel better knowing that I know the process from start to finish. I am really enjoying making this book and I can't wait until it is finished and in stores near you.
To be continued...


Thursday, November 1, 2018

Be inspired!


My kids inspire me. 

The other day I sat down at the kitchen table to work on my storyboard for Little Jack Thomson and his Magnificent Brain. I wouldn’t normally do this while my kids are home because they are usually far too distracting, want food or drink, or need emergency services from me like band-aids, cuddles, or mediation. However, I had some really great ideas I wanted to get down on paper right away and I had one child away at a birthday party, so I decided to give it a try.

Within a few minutes, my four year old wanted to draw, too. So, I stopped what I was doing and got a piece of paper and some markers and sat him next to me. Then my seven year old wanted to draw. Soon, we were all drawing together quietly at the table. Yes, quietly. And, everyone was concentrating on their picture and we were all in the flow. It was total bliss. 

After we drew for awhile, though, I was the one distracted. When did my four year old learn to draw such dramatic trees and use such pencil strokes? It is such a great feeling when you see your child has made a leap in their development whether it's physically, mentally, or artistically. I loved his fantasy! The tree was getting hit by lightning which was coming from inside the house. The tractor had run into the tree. My son shared his story with me about everything in his picture and I listened like a child hearing a bedtime story.

I asked my children then to look at my storyboard and tell me what they see. It was wonderful to hear my children give praise and critique of my pictures and reminded me that their opinions were more precious than any I would receive elsewhere. Not only are children brutally (and tenderly) honest but they also see things differently. As an illustrator it is important to be able to see through a child’s eyes. I am lucky to have small children around me who inspire me to see what they see and feel what they feel and I am sure my illustrations will be better because of them.

Tuesday, October 16, 2018

Little Jack Thomson and his Magnificent Brain

Little Jack Thomson and his Magnificent Brain
First illustration, Linocut with watercolor - Oct. 2018

About a year ago, I began writing Little Jack Thomson and his Magnificent Brain. I was lucky enough to have a few weeks off from teaching and I finally had some time to write.

One of my sons was struggling with reading, making our after school homework time really exhausting for both of us.  This motivated me to write a story which was uplifting for children who also have difficulties at school and to encourage those who feel rejected because they think differently than everyone else. As a teacher I have worked with many children with special needs, and I wanted to write a book which also supported parents and educators who work diligently to help children feel special in spite of the adversities they face.


Little Jack Thomson is a gifted young boy who has autism and dyslexia. After one horrible day in school where Jack is made fun of by one of his peers, he comes home feeling distraught and upset.

Little Jack Thomson was feeling quite down.
He wanted to talk, but no words could be found.
He’d worked so hard learning his spelling last night,
But today on his test, only his name was spelled right.
One kid in is class said, “You’re stupid and slow.”
Jack repeated the words and felt lower than low.

Little Jack Thomson sat on his bed.
He rocked back and forth and held onto his head.
He thought about rockets ‘cause that made him feel good
and relaxed just a little, as much as he could.
There were so many things that Jack wanted to do,
but with grades like his, he knew he was through.

Jack’s mother, however, believes in him and is determined to show him just how magnificent he really is. She begins by telling him some stories of others who also achieved great things while overcoming similar obstacles and tries to convince him that he should never stop asking the questions that he finds important.

“You can never ask too many questions, or know too many things.
Who knows, little Jack, what the future will bring? 
Those questions may lead you to invent something new,
you might change the world, or make a new theory or two.
You don’t have to be perfect, you just have to try.
It’s important you ask who, when, where, what, and why. 
Don’t ever give up, Jack, you are one of a kind.
Keep asking questions and open your mind.”

Jack’s mother’s stories slowly start to lift his spirits and once again he begins to believe in himself and all of the great things he could become.

And then Jack stopped and stood straight and tall
He glanced at his mom, smiled, and looked anything but small.
“The other kids,” he said “may be better than me
at reading, and spelling, and climbing a tree.
But when it comes to ideas, I’m the best of the best.
And one day, my theories will be put to the test.”

“I have ideas for how to fly a rocket to Neptune,
build a train between planets, and mine rocks on the moon.
I’ve have plans for building a soap-powered plane,
Someday they will say I have a magnificent brain!...

If you would like to know more about Little Jack Thomson and his Magnificent Brain, please let me know. I am currently looking for literary representation and encourage any critique or advice that is sent my way.  Please check my website for more information and contact details at kelleydonner.com.


Saturday, September 22, 2018

Cambridge

Cup of tea anyone?

After living the last 6 years in beautiful northern Germany, my husband got an offer from his company that he couldn't refuse and we decided to give it a go and move to Cambridge, England.

The last three months have been pretty stressful to say the least. We cleaned out every drawer, got rid of anything we didn't need and sold our pretty little house in Germany. Moving with kids is not easy, and moving into a smaller house than the one you had before is harder, yet. I don't know how the British deal with not having any storage space. No wonder they get culture shock when they come to the states. Nevertheless, we did it. I can proudly say we are all settled in and almost everything fit.  Cup of tea anyone?

So far England has been quite nice. The weather has been good, the people are all really friendly, and the food has been surprisingly yummy. I'm even learning how to make Indian food. As I love to experiment in the kitchen, I'm sure that eventually I will create some German-British-American-Indian crossover foods for my blog. Schnitzel Marsala sound good?

The kids have already started school and I drop them off looking adorable in their smart little uniforms every morning. Back in Germany, between teaching and taking care of family matters, I didn't have much time to do many of my own projects. I decided that when we left, I would not look for a teaching position directly, but first concentrate on a few things that I have been working on the last few years. I want to do more artwork, more illustrations, and even publish a children's book.  Cambridge is a fantastic city and it has a lot to offer. I am looking forward to all of the great things that will happen in the next year. I can't wait to get started. Wish me luck!

Tuesday, March 21, 2017

Easter Basket Zwiebach Frogs


I don't know about you, but my kids get way too much chocolate on holidays. They get a bunny from family, friends, and neighbors as well as from the school, Kindergarten, and the grocery store. We end up swimming in chocolate. I wish more people would offer fun, healthy alternatives. 

If you are interested in making your kids Easter baskets a little bit healthier this year, these Zwiebach animals are easy to make and a lot of fun (What is Zwiebach?).  They would also look great in an Easter nest ready to be nibbled up on Easter morning.

Making Zwiebach Frogs is a great way to combine fun with food.  These frogs are easy to make and this dough requires very little kneading making it a great activity for children. Your kids can make bunnies and chickens, too. Add vegetables or fruit for garnish or lay them out on a pretty plate filled with goodies. Enjoy!
Here’s the how to:

Easy Zwiebach Frogs

1 C warm water
1 ½ T dry yeast
2 T sugar
¼ C oil
3 C flour
1 t salt

For frogs, you will also need string cheese, raisins, and a toothpick

1. Mix warm water, yeast, and sugar. Let stand until foamy, then add oil. Blend in flour and salt with a fork until the dough starts to stick together. Use your hands to finish the dough by kneading it a few times, not long, and then forming it into a flat ball. Put dough back in large bowl, cover, and let rise until double in size. If it is still hot where you live, put the bowl outside to make it rise faster.

2. Pull off pieces of dough and roll them in your hand to form golf ball sized balls. These balls will be the frog body. Place them on a greased cookie sheet. Then pull off smaller balls and pinch them around the body to make the legs and feet. Roll very small balls to make the eyes.

3. Now take a toothpick, and poke a hole in the eye piece of dough. Move the toothpick around a little to make the hole big enough to fit a half a raisin. Cut a raisin in half and using the toothpick again, push the raisin into the hole. Do the same for the other eye.

4. Pull off little strings of string cheese. Wrap the cheese around the large part of the body dough ball and then use the toothpick to push in the ends into the dough, so that it stays in place. This part can actually be a little tricky. You may need to wet the cheese for it to hold better.

5. Now let your frogs rise again, about 15 minutes. I have also baked some Zwiebach, which you can also see on the picture. While they are rising, you can turn your oven on to 350 degrees. You may need to push some of the balls back into place, as the rising sometimes will push the balls apart.

6. Place frogs in the oven and bake for about 15 minutes or until lightly brown. Serve the frogs on homemade lily pads. Cut out green hearts out of paper. I used a plastic flower, but you could also cut flowers out of paper as well. Eat with butter and cheese, but first have your frogs jump around the table.

Monday, May 18, 2015

5 Simple Ways Airlines Could Make Flying with Small Children Easier

Pretty impressive, huh? One hour of bliss
and then one jerked in his sleep and knocked
the tray table. It was great while it lasted.
Dear Airlines,

Traveling with a lap baby is difficult. Traveling with a lap baby and two kids under 5 is like child boot camp. Your kids are expected to be quiet, stay in their seats, eat off little tray tables without knocking anything on the floor, sleep during the day, eat in the middle of the night, and go to tiny bathrooms where they are not allowed to touch anything. I just finished a 30 hour flight from New Zealand to Germany, and I personally think I have now earned my ranks as Commander in Chief.
Seriously, no one wants to sit next to a screaming toddler or an uncomfortable baby.  And yet, hardly anything on a plane has been made with children in mind. It is in everyone's best interest to improve conditions on airplanes for families.


Therefore, here is my list of 

5 simple things you, the airlines, could do to make flying with small children on long flights easier.

1. Get rid of the bassinet and find something more practical to hang on the wall. I’ve flown now with three children and I can tell you, flying with a child under 6 months is the easiest.  Babies at this age sleep a lot and are usually very content to sleep on your arm. After six months, most babies are too big for the bassinet anyway and it’s annoying always having to wake them up every time the seat belt sign comes on. Instead of a bassinet, I would love to have a mini high chair or seat with shoulder straps so that I could feed my child somewhere other than my lap.  Or, they could hang up one of those toddler wall toys, so that your little ones would have something to do other than lick their armrest or walk back and forth through the aisles.

Jonas at seven months in the bassinet
2. Find a different way to strap a baby onto your lap. Those little extra seat belts that you fit onto your own seat-belt are very impractical. The baby always ends up having to sit right on the metal part of your own seat-belt and whenever you try to move your child around, say to nurse, you often accidentally unhook the child’s belt. Surely, they could make a better harness that is not so clunky. And honestly? I bet having your child in a baby carrier strapped to your chest has got to be a thousand times safer. It would sure be easier, especially with super squirming babies like I had.

3. Add sack lunches to your meal choices. Adult ones and ones for kids ages 1-6. First of all, on most long flights you don’t get your meals until the middle of the night when your children are already asleep. If you wake them up, they are then supposed to eat off of little tray tables with tons of little cups and saucers which love to get knocked off on the floor, especially when they are not picked up for an hour after the meal. Don’t even add turbulence to this equation. Toddlers and airline meals are not a good combination. Secondly, if you have a lap baby who either refuses to go to sleep or sleeps wildly, it is impossible to eat your own meal. If there were sack lunches with say bologna sandwiches, fruit, and animal crackers, you could give your children their lunch whenever they were hungry. Also, it would be possible to eat your own meal while your lap baby is awake. My first child at seven months slept only an hour and a half of an eleven hour flight. Trust me, mothers would be thrilled to not have to deal with those meal trays.
My child training for the marathon

4. Add drink bottles to your coloring books and crayons that you give to the children as handouts. Children under 6 are not capable of not spilling things. And, while you are at it, make a little fold out ring on the back of the seat in front where they can put their drink, instead of on the tray tables. Although the cups would cost slightly more, I’m sure the money would easily be saved on cleaning costs alone.

5. Ditch the huge TV in the front of the plane. It’s always on the bulkhead wall where all of the families sit with their little kids and it is annoyingly distracting.  It’s not only bright, but unlike a TV at home you can’t shut it off when it is time to put your kids to bed.  It is really hard for little kids not to look at a TV screen when it is on. My oldest child was incapable of tuning out the TV and it made it really difficult to get him to sleep. Everyone has a TV on the back of their chair. You don’t need an extra one as if the plane is a sports bar.

I’ve flown a lot with little children and I can guarantee that if your children are happy, the other passengers are happy as well. No one wants over-tired, hungry children sitting next to them. Implementing these five things would make flying so much more humane, and would make me feel more like a mom instead of a sergeant.

Thanks in advance. Please don't hesitate to contact me for further suggestions.

Sincerely,

One Tired Mom

Germany, New Zealand, and little Max

Raising three little boys takes a lot of time and energy and unfortunately, I haven't had much free time to spend on my blog. Nevertheless, the last year and a half has been pretty exciting.

Our youngest son Max Johann is now a little over a year old and is the happiest kid in town. Jonas is five, still loves tractors and will be starting school this fall. Lukas just turned four with a big soccer party and is still in German Kindergarten.

The biggest event of the last year, however, was a trip with the whole family to New Zealand where we lived for three months so that my husband could work at a research station. Since kids begin school there at five, Jonas was even able to attend the local primary school. I spent most of my day bringing the boys to school and preschool and taking care of Max who was starting to crawl everywhere. On the weekends we took day trips around the area and saw fantastic waterfalls and scenery. It was a fantastic experience and we all saw and learned a lot.

As you can imagine, we have all been pretty busy. Hopefully, now that we are back in Germany and the boys are getting older I will be able to have more time to share some crafts, recipes, and thoughts with all of my loyal readers. I look forward to seeing you soon!

Tuesday, November 19, 2013

Painted Tree Silhouettes

I love painting, but having small children hasn’t made it easy to paint very much, other than the occasional finger painting extravaganza.  Therefore, I was overly excited about painting the boys’ room. I have always wanted to do something creative on the walls and I finally had a good idea and was ready to begin.
. 
I’ve always found trees fascinating and thought that you could stare at them for hours.  I decided to make some tree silhouettes on two walls in the room with the trees white and the walls blue. I didn’t paint the whole room blue, because I didn’t want it to feel too small and I like the contrast of the white walls in between. 

After planning everything out, I waited until my mother-in-law came up for a week, so that I would be able to work in their room as uninterrupted as possible.  Unfortunately, Jonas got the flu that week.  Luckily, he was happy to lay in his bed in his room, watch Little Red Tractor on the Ipad and watch me paint.

I went online to see what info I could find about how to do silhouettes neatly, but could only find how-to’s on how to do patterns like chevrons.  This still proved very helpful and taught me what I needed to know in order to make crisp lines without any leaks.

I was very pleased with how the room turned out and the boys like it as well.  Jonas loves cats, and his stuffed Baby Kitty often tries to climb up the tree or catch a bird. At night when only a nightlight is on, it is easy to imagine being outside.  Even though blue is usually a cold color, the trees and dark color seem to add a bit of warmth to the room that was much needed. 

Here’s the How to:

1.  Decide what wall or walls you are going to paint, and make sure they are clean.  In Germany, almost all walls have Raufasertapete, which is a kind of textured wallpaper with a paper-like consistency that is usually then painted over with white paint.  I used a cloth to wipe down the walls and make sure they were dust and spider web free.

2.  Get out your masking tape!  There is a difference when it comes to masking tape.  If you can afford it, buy the good painter’s tape that doesn’t over-stick.  I began with this tape, but ran out and finished my project with plain old masking tape.  Both worked well, but the masking tape pulled off some of the wallpaper, which I had to touch up later. 

I drew out my drawing in a sketchbook first and then freehanded it with the masking tape on the wall.  If you want to make a rounded edge, you will need to just tear many little pieces of tape and lay them over each other like a fan. If you would like to make shapes, like my birds (and don’t want to free-hand them), you can put the tape in strips on wax paper and then cut out patterns with a scissors or knife.    

The most important thing is that the outside line of your silhouette looks sharp.  Use your finger to press the tape down along this entire edge. Don’t forget to do this also on the sides of your wall.

3.  Time to paint.  In order to get clean lines, it is very important that you follow this step.  You will need to first paint along the outer edge of your masking tape silhouette using your original wall color, which is usually white along with the sides of your wall.  This seals the tape on the side and prevents those little color drips.

Now you can take your background color (I used blue), and begin painting.  I used a professional roller made for details.  It is somewhat like a sponge and doesn’t hold as much paint as a traditional roller, but it also doesn’t splatter.  You will just need to press a bit harder and roll over some areas a few more times.  You may also want to buy a little roller for getting into tough spots.  A roller will leave a much nicer finish than a paint brush.  If you have areas that are too detailed, use more masking tape or paper to mark off the wall so that you can roll over it. It will save you time and look better.

4.  Finally, pull off the tape carefully while it is still wet!  This sounds a lot easier than it is, as masking tape is really sticky and now wet with paint.  I wear those plastic gloves like doctors wear when I paint a big project, so my hands don’t get covered. Then once your wall is dry, you can go in and do touch ups with a paintbrush.

 I think you will be amazed how easy it is to make beautiful silhouettes on your walls that look like they were professionally done.  Here is a picture of both finished walls.  I have now put Jonas's bed in front of the wall on the left and a white dresser on the left side of the wall on the right. 

As always, good luck and have fun!